Metamask + Uniswap
MetaMask is a popular Ethereum wallet that allows users to easily and securely interact with decentralized applications (dapps) on the Ethereum blockchain. Uniswap is a decentralized protocol for exchanging Ethereum tokens that enables users to trade directly from their MetaMask wallets. In this article, we'll show you how to connect your MetaMask wallet to Uniswap and start trading Ethereum tokens.
How to Use Metamask and Uniswap Together
To use Metamask and Uniswap together, you first need to install both apps. Metamask is available on the Google Play Store and Uniswap is available on the App Store.
Once both apps are installed, open Metamask and click on the "Add Wallet" button.
Next, add your Uniswap account credentials by clicking on the "Add Account" button.
After your Uniswap account has been added, select it from the list of wallets and click on the "Connect" button.
Finally, select the ERC20 token you would like to trade and click on the "Trade" button.
Congratulations! You have now successfully used Metamask and Uniswap together to trade ERC20 tokens.
The Benefits of Using Metamask and Uniswap Together
There are many benefits to using Metamask and Uniswap together. For example, using Metamask will allow you to keep your cryptocurrencies safe and secure. Additionally, using Uniswap will allow you to quickly and easily trade cryptocurrencies with other users.
How to Get the Most Out of Metamask and Uniswap
When it comes to cryptocurrency, Metamask and Uniswap are two of the most popular tools available. Both allow you to safely and easily store, trade and use cryptocurrencies. Here are a few tips on how to get the most out of them:
1. Setup Metamask
To get started with Metamask, you first need to install the browser extension. Once it’s installed, you will need to create a Metamask account. You can do this by clicking on the “Create New Account” button on the main Metamask homepage.
Once you have created your account, you will need to download the Metamask extension. You can do this by clicking on the “Metamask” logo on the main Metamask homepage and then clicking on the “Download” button. After you have downloaded the extension, you will need to install it. You can do this by clicking on the “Metamask” logo on the main Metamask homepage and then clicking on the “Install” button.
Once you have installed the Metamask extension, you will need to create a new wallet. You can do this by clicking on the “New Wallet” button on the main Metamask homepage and then entering your desired password. After you have created your new wallet, you will need to add some Ethereum or ERC20 tokens to it. You can do this by clicking on the “Add Token” button on the main Metamask homepage and then entering the token’s address and/or contract name. After you have added the token, you will need to click on the “Save” button to save your changes.
2. Use Metamask to Trade Cryptocurrencies
To use Metamask to trade cryptocurrencies, you first need to open a trading account with one of the exchanges that Metamask supports. You can do this by clicking on the “Open an Exchange Account” button on the main Metamask homepage and then entering your desired exchange’s login information. Once you have opened your trading account, you will need to add funds to it. You can do this by clicking on the “Deposit Funds” button on the main Metamask homepage and then entering the amount of Ethereum or ERC20 tokens that you want to deposit. After you have added the funds, you will need to click on the “Trade” button to begin trading.
3. Use Metamask to Store Cryptocurrencies
To use Metamask to store cryptocurrencies, you first need to create a wallet. You can do this by clicking on the “Create Wallet” button on the main Metamask homepage and then entering your desired password. After you have created your new wallet, you will need to add some Ethereum or ERC20 tokens to it. You can do this by clicking on the “Add Token” button on the main Metamask homepage and then entering the token’s address and/or contract name. After you have added the token, you will need to click on the “Save” button to save your changes.
4. Use Metamask to Send and Receive Cryptocurrencies
To use Metamask to send and receive cryptocurrencies, you first need to create a wallet. You can do this by clicking on the “Create Wallet” button on the main Metamask homepage and then entering your desired password. After you have created your new wallet, you will need to add some Ethereum or ERC20 tokens to it. You can do this by clicking on the “Add Token” button on the main Metamask homepage and then entering the token’s address and/or contract name. After you have added the token, you will need to click on the “Send” button to begin sending coins. You will also need to enter the recipient’s address and wallet address. Finally, you will need to enter the amount of Ethereum or ERC20 tokens that you want to send.
5. Use Metamask to View Your Cryptocurrency Balance
To use Metamask to view your cryptocurrency balance, you first need to open a wallet. You can do this by clicking on the “Open a Wallet” button on the main Metamask homepage and then entering your desired password. After you have opened your wallet, you will need to click on the “View Wallet Info” button to view your balance and transaction history.
How to Use Metamask and Uniswap to Maximize Your Profits
Metamask and Uniswap are two of the most popular decentralized exchanges on the market. They both allow users to trade cryptocurrencies and tokens directly with each other, without the need for a third-party.
Metamask
To use Metamask, you first need to download the app from the App Store or Google Play Store. Once you have the app installed, you will need to set up your account. First, you will need to create a Metamask account. After you have created your account, you will need to login. Next, you will need to add a supported wallet. Metamask supports a variety of wallets, including MyEtherWallet, Ledger, and Trezor. After you have added your wallet, you will need to add an ERC-20 token. To do this, you will need to open the Metamask app, click on the three lines in the top right corner, and select “Add Token.” After you have added your token, you will need to proceed to exchange it for ETH. To do this, you will need to click on the three lines in the top right corner, and select “Exchange.” After you have exchanged your token for ETH, you will need to proceed to buy ETH using your newly acquired ETH. To do this, you will need to click on the three lines in the top right corner, and select “Buy ETH.” Finally, you will need to complete the transaction by clicking on the blue “Send” button.
Uniswap
To use Uniswap, you first need to download the app from the App Store or Google Play Store. Once you have the app installed, you will need to set up your account. First, you will need to create a Uniswap account. After you have created your account, you will need to login. Next, you will need to add a supported wallet. Uniswap supports a variety of wallets, including MyEtherWallet, Ledger, and Trezor. After you have added your wallet, you will need to add a supported token. To do this, you will need to open the Uniswap app, click on the three lines in the top right corner, and select “Add Token.” After you have added your token, you will need to proceed to exchange it for WAVES. To do this, you will need to click on the three lines in the top right corner, and select “Exchange.” After you have exchanged your token for WAVES, you will need to proceed to buy WAVES using your newly acquired WAVES. To do this, you will need to click on the three lines in the top right corner, and select “Buy WAVES.” Finally, you will need to complete the transaction by clicking on the blue “Send” button.
How to Use Metamask and Uniswap to Save Time and Money
Metamask and Uniswap are two cryptocurrency wallets that allow users to make quick and easy trades. By using these wallets, traders can save both time and money.
To use Metamask, first open the app and click on the "Metamask" button in the top left corner. This will open the Metamask interface.
To use Uniswap, first open the app and click on the "Uniswap" button in the top left corner. This will open the Uniswap interface.
Once the interfaces are open, you will need to input the details of your trades. To do this, first click on the "Metamask" button and then input the details of your trade, such as the trade amount, the currency you are trading in, and the trade destination.
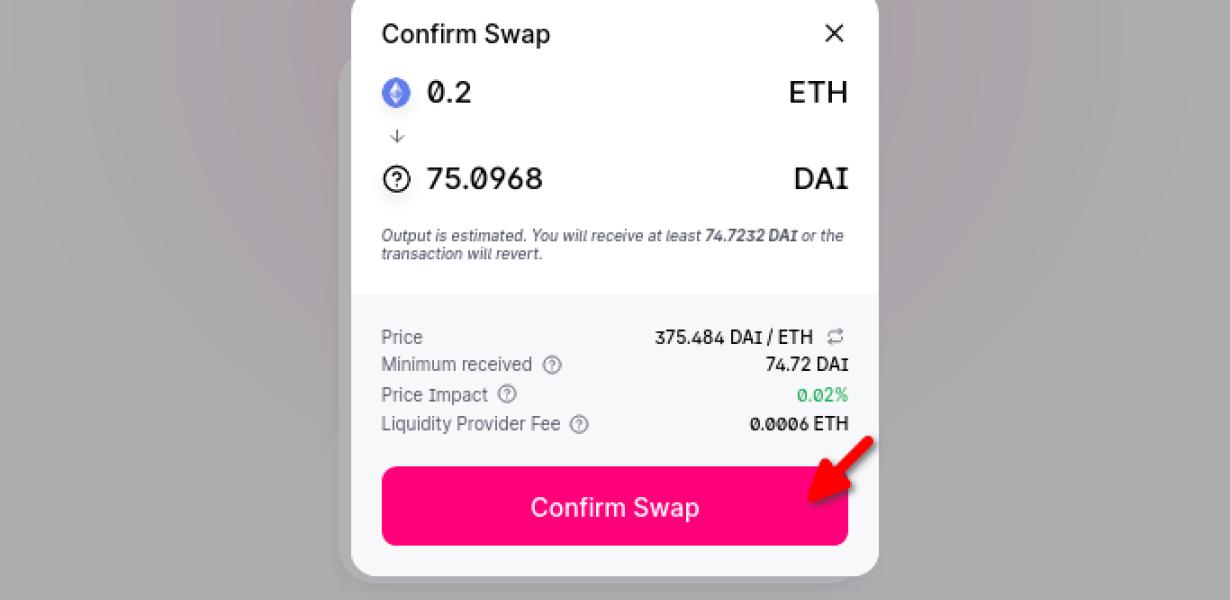
Once you have input all of the details, click on the "Swap" button and input the details of your trade, such as the trade amount, the currency you are trading in, and the trade destination.
Once you have entered all of the details, press the "Swap" button to complete your trade.
The Ultimate Guide to Using Metamask and Uniswap
Metamask and Uniswap are two of the most popular dApps in the Ethereum ecosystem. They allow users to create and trade contracts with one another without having to trust a third party.
In this guide, we will walk you through the basics of how to use Metamask and Uniswap to make contracts with other users. We will also explain how to secure your identities and keep your funds safe.
What is Metamask?
Metamask is a browser extension that allows users to interact with Ethereum dApps. It works by allowing users to sign contracts and transactions with their private keys. This makes it much more secure than using third-party applications or exchanges.
How to Use Metamask
To start using Metamask, you will need to install the extension on your browser. After you have installed the extension, you will need to login to your Metamask account.
Once you have logged in, you will need to find the Ethereum address of the dApp you want to use. To do this, open the menu on the left-hand side of the screen and select "Contracts."
Next, you will need to find the contract you want to use. To do this, select the contract from the list on the right-hand side of the screen.
After you have found the contract, you will need to open it. To do this, click on the "Open" button in the bottom-right corner of the screen.
After you have opened the contract, you will need to set up your Metamask account. To do this, click on the "Set up Metamask" button in the bottom-right corner of the screen.
After you have set up your Metamask account, you will need to create a password. To do this, type in your password and then click on the "Save" button in the bottom-right corner of the screen.
After you have created your password, you will need to set up your security settings. To do this, click on the "Enable security" button in the bottom-right corner of the screen.
After you have enabled security, you will need to select your security settings. To do this, click on the "Select security settings" button in the bottom-right corner of the screen.
Next, you will need to set up your identity verification. To do this, click on the "Enable identity verification" button in the bottom-right corner of the screen.
After you have set up your identity verification, you will need to set up your wallet address. To do this, click on the "Select wallet address" button in the bottom-right corner of the screen.
After you have set up your wallet address, you will need to set up your security settings. To do this, click on the "Enable security" button in the bottom-right corner of the screen.
After you have enabled security, you will need to set up your Metamask preferences. To do this, click on the "Metamask preferences" button in the bottom-right corner of the screen.
Next, you will need to set up your preferences for how your transactions are processed. To do this, click on the "Transaction settings" button in the bottom-right corner of the screen.
After you have set up your preferences, you will need to set up your preferences for how your data is processed. To do this, click on the "Data settings" button in the bottom-right corner of the screen.
After you have set up your preferences, you will need to click on the "OK" button in the bottom-right corner of the screen.
After you have clicked on the "OK" button, you will be ready to make a transaction with a friend or a stranger. To do this, open a new tab and enter the Ethereum address of the person or dApp you want to transact with into the address field.
Next, enter the amount of Ethereum you want to send them into the amount field. After you have entered the amount of Ethereum, you will need to enter your Metamask password into the password field.
After you have entered your Metamask password, you will need to click on the "Send" button in the bottom-right corner of the screen.
After you have clicked on the "Send" button, your transaction will be processed and you will be able to see the transaction details in the "Transaction History" tab of your Metamask account.
How to Use Uniswap
Uniswap is a dApp that allows users to trade contracts with each other. Unlike Metamask, Uniswap does not require users to login or set up an account. Instead, Uniswap works by allowing users to exchange contracts with each other directly.
To start using Uniswap, you will first need to find a friend or stranger who has Uniswap installed on their computer. You can find Uniswap by visiting https://uniswap.com/.
Once you have found a friend or stranger who has Uniswap installed, you will need to send them a message asking them to trade contracts with you. To do this, open a new tab and enter the Ethereum address of the person or dApp you want to trade contracts with into the address field.
Next, enter the amount of Ethereum you want to trade contracts with them into the amount field. After you have entered the amount of Ethereum, you will need to enter your Metamask password into the password field.
After you have entered your Metamask password, you will need to click on the "Send" button in the bottom-right corner of the screen.
After you have clicked on the "Send" button, your transaction will be processed and you will be able to see the transaction details in the "Transaction History" tab of your Metamask account.
The Beginner's Guide to Using Metamask and Uniswap
Metamask is a decentralized application that allows users to manage their identities and digital assets. Uniswap is a decentralized exchange that allows for the trading of ERC20 tokens.
To use Metamask:
1. Open the Metamask application on your computer.
2. Click on the "Add new account" button in the top-right corner of the screen.
3. Enter your email address and password into the fields that appear.
4. Click on the "Create new account" button.
5. Metamask will now generate a random key for you. You will need this key to access your Metamask account. You can copy this key or keep it handy for later.
6. To add a new account, open Uniswap and enter the details of the account you wish to trade with. Uniswap will then generate a unique account address for you. You will need this address to complete the trade.
To use Uniswap:
1. Open Uniswap and click on the "Trade" button in the top-left corner of the screen.
2. Select the token you wish to trade from the list of available tokens.
3. Click on the "Exchange" button in the bottom-right corner of the screen.
4. Enter the details of the trade you wish to make, including the account address of the recipient and the amount of tokens you are sending.
5. Click on the "Confirm trade" button.
How to Use Metamask and Uniswap Like a Pro
Metamask and Uniswap are two of the most popular Ethereum wallets. They allow you to store, send, and receive Ethereum and ERC20 tokens.
To use Metamask and Uniswap, first download the wallets from their respective websites. Once you have downloaded the wallets, open them and click on the “Add Account” button.
Next, enter your Metamask or Uniswap username and password. Click on the “Connect” button to connect to the Ethereum network.
Once you have connected to the Ethereum network, you will need to generate a new keypair. To do this, click on the “Generate New Keypair” button and follow the instructions.
Now that you have generated a new keypair, you can start using Metamask and Uniswap to store, send, and receive Ethereum and ERC20 tokens.
10 Tips for Using Metamask and Uniswap Together
1. Use Uniswap to store your Metamask data. This way, you have a single place to store your keys, passwords, and other sensitive information.
2. Use Metamask to send and receive tokens. This way, you can securely interact with decentralized applications (dApps) and other users without having to share your personal information.
3. Use Uniswap to create new tokens. This way, you can quickly and easily create new tokens without having to learn about blockchain technology.
4. Use Metamask to access your tokens. This way, you can easily store, send, and use your tokens without having to carry around a copy of the blockchain.
5. Use Uniswap to keep track of your token balances. This way, you can always know how much money you have invested in your tokens and where it is located.
6. Use Uniswap to manage your private keys. This way, you can keep your keys secure and private without having to carry them around with you.
7. Use Uniswap to keep track of your token transactions. This way, you can easily keep track of the transactions that have taken place related to your tokens.
8. Use Uniswap to store your ERC20 tokens. This way, you can easily store your tokens on the Uniswap platform and use them in dApps.
9. Use Uniswap to store your NEP5 tokens. This way, you can easily store your tokens on the Uniswap platform and use them in dApps.
10. Use Uniswap to store your ERC721 tokens. This way, you can easily store your tokens on the Uniswap platform and use them in dApps.
The Benefits of Using Metamask and Uniswap Over Other Options
There are many benefits to using Metamask and Uniswap over other options.
First, Metamask and Uniswap are two of the most secure options for cryptocurrency trading. Both platforms use state-of-the-art security features, including multi-signature wallets and cold storage. This means that your coins are safe even if the platform is hacked.
Second, Metamask and Uniswap offer fast and easy trading. Both platforms have built-in trading tools, so you can quickly and easily buy and sell cryptocurrencies.
Finally, Metamask and Uniswap are both user-friendly platforms. Both platforms have simple interfaces that makes it easy to get started trading cryptocurrencies.
How to Use Metamask and Uniswap Together to Make Money
The first step is to install Metamask and Uniswap. Metamask is a browser extension that allows you to trade Ethereum and other ERC20 tokens. Uniswap is a decentralized exchange that allows you to trade ERC20 tokens with other users.
To use Metamask and Uniswap together, you need to set up a wallet on Metamask. You can do this by clicking on the “Create New Wallet” button on the Metamask homepage, and following the instructions.
Once you have a Metamask wallet set up, you can trade Ethereum and other ERC20 tokens on Uniswap. To do this, you need to first create an account on Uniswap.
To create an account on Uniswap, you need to input your Metamask address and password. Then, you need to fill in your personal details, such as your name and email address.
After you have created your account on Uniswap, you can start trading ERC20 tokens on the platform. To do this, you need to click on the “Trade” button on the main menu of the Uniswap website, and select the ERC20 tokens you want to trade.
Then, you need to enter the amount of tokens you want to trade, and the trade deadline. The trade deadline is the time limit within which you want to complete the purchase or sale of the ERC20 tokens.
Finally, you need to click on the “Start Trade” button, and wait for the transaction to be completed.
How to Use Metamask and Uniswap Together to Get Rich
Metamask and Uniswap are two essential tools that every crypto trader should have in their arsenal. They allow you to easily purchase and sell cryptocurrencies, as well as access a variety of other features.
To use Metamask and Uniswap together, first open Metamask and click on the “Add Wallet” button. This will open the Add Wallet window.
Next, enter the Uniswap address into the “Uniswap Address” field and the Metamask address into the “Metamask Address” field. Click on the “Connect” button.
After connecting your Metamask and Uniswap accounts, you will be able to see all of your assets and transactions in both accounts. To make a purchase or sale, simply click on the appropriate buttons in the respective fields.