Import Exodus Wallet To Metamask
This article will show you how to import your Exodus wallet into Metamask. You will need your twelve-word recovery phrase from Exodus. If you don't have this, you will not be able to import your wallet.
How to Import Your Exodus Wallet into MetaMask
To import your Exodus Wallet into MetaMask, first open MetaMask and click on the three lines in the top right corner. This will open your account settings.
Next, click on the "Add Wallet" button on the left.
On the "Import Exodus Wallet" window that pops up, paste your Exodus Wallet address into the "Address" field and click on the "Next" button.
On the "Select Wallet Features" window that pops up, make sure the "Enable Importing Addresses" checkbox is checked and click on the "Next" button.
On the "Verification Code" window that pops up, enter the verification code that you received when you registered your Exodus Wallet and click on the "Next" button.
On the "Confirm Import" window that pops up, review the import details and click on the "Yes, import my Exodus wallet" button.
Your Exodus Wallet will now be imported into MetaMask and you can start using it to store your cryptocurrencies.
Exodus Users: Here's How to Import Your Wallet into MetaMask
The first thing you'll need to do is open MetaMask and click on the three lines in the top left corner. This will open your wallet's address bar.
Copy the address of your Exodus wallet.
Next, open MetaMask and click on the three lines in the top left corner. This will open your wallet's import dialog.
Paste your Exodus wallet's address into the "Address" field.
Click on the "Import" button.
MetaMask will now begin importing your Exodus wallet. It may take a few minutes, so be patient. Once it's done, you'll be able to use your Exodus wallet just like you normally would.
Need to Import Your Exodus Wallet into MetaMask? Here's How
Importing your Exodus wallet into MetaMask is simple. First, open MetaMask and click on the three lines in the top right corner. Next, click on "Add Wallet."
On the next screen, enter the Exodus wallet address and password. Then, click on "Import."
Your Exodus wallet will now be imported into MetaMask. You can use it to manage your cryptocurrencies and transactions.
Quick and Easy Guide to Importing Your Exodus Wallet into MetaMask
If you want to import your Exodus wallet into MetaMask, there are a few simple steps you can take.
1. Open MetaMask and click on the three lines in the top left corner.
2. Click on the “Import Wallet” button in the top right corner.
3. Select your Exodus wallet file and click on the “Import” button.
4. You will now be prompted to confirm the import. Click on the “Import” button again to finish.
Don't Miss This! Import Your Exodus Wallet into MetaMask Now
If you're not already using Exodus, now is the time to import your Exodus wallet into MetaMask. This will allow you to easily keep track of your Exodus coins, and make transactions with them on the Ethereum network.
To import your Exodus wallet into MetaMask:
1. Open MetaMask.
2. Click the three lines in the top left corner of the window.
3. Click the "Add Wallet" button.
4. Enter the wallet address of your Exodus account.
5. Click the "Import" button.
6. Your Exodus wallet has now been imported into MetaMask.
Tired of Exodus? Here's How to Import Your Wallet into MetaMask
Exodus is a popular wallet for cryptocurrency investors and traders. However, some users may want to switch to another wallet for various reasons. If you want to import your Exodus wallet into MetaMask, there are a few steps you need to take.
First, open the Exodus wallet on your computer. Next, click on the "Wallet" button in the top left corner of the window. You will now be able to see all of your Exodus wallets. If you have more than one wallet, you will need to select the correct one.
Next, click on the "Import Wallet" button. You will now be able to enter the details of your Exodus wallet. You will need to provide your Exodus wallet address and password. You will also need to provide your MetaMask account address. Finally, you will need to specify the type of wallet you want to import your Exodus wallet into. You can choose between "Exodus" and "MetaMask".
Once you have completed the import process, your Exodus wallet will be imported into your MetaMask account. You can now use your Exodus wallet to store and trade cryptocurrencies.
Ready to Switch to MetaMask? Here's How to Import Your Exodus Wallet
Once you have downloaded and installed the MetaMask extension, you will need to import your Exodus wallet. To do this, open the MetaMask extension and click on the “import wallet” button.
Next, you will be prompted to enter your Exodus wallet address. You will then be asked to verify your account. After verifying your account, you will be able to view your Exodus wallet balance and transactions.
Want the Best Ethereum Experience? Import Your Exodus Wallet into MetaMask!
One of the best ways to experience Ethereum is to import your Exodus wallet into MetaMask. With MetaMask, you can securely store your Ethereum and other cryptocurrencies, and make transactions with ease.
Make the Switch to MetaMask today and Import Your Exodus Wallet
MetaMask is a browser extension that allows you to interact with the Ethereum blockchain.
To make the switch to MetaMask, first open up your web browser and access https://www.metamask.io/.
Next, click on the "Install" button in the top right corner of the MetaMask window.
After the installation is complete, you'll be prompted to log into MetaMask. If you're not already logged in, you'll need to enter your email address and password to do so.
Once you're logged in, you'll see a list of all of the wallets that are currently registered to your account. To import your Exodus wallet, click on the "Import Wallet" button located in the top left corner of the MetaMask window.
Next, enter the Exodus wallet address that you copied earlier and click on the "Import" button.
After the wallet has been imported, you'll be able to view all of the transactions that have taken place on the Exodus wallet within the MetaMask window.
Get the Most Out of Your Ethereum by Importing Your Exodus Wallet into MetaMask
When you first install MetaMask, it will ask if you want to import your Exodus wallet. If you already have an Exodus wallet, you can skip this step.
If you don’t already have an Exodus wallet, you can create one by clicking on the "Create New Wallet" button on the MetaMask home screen.
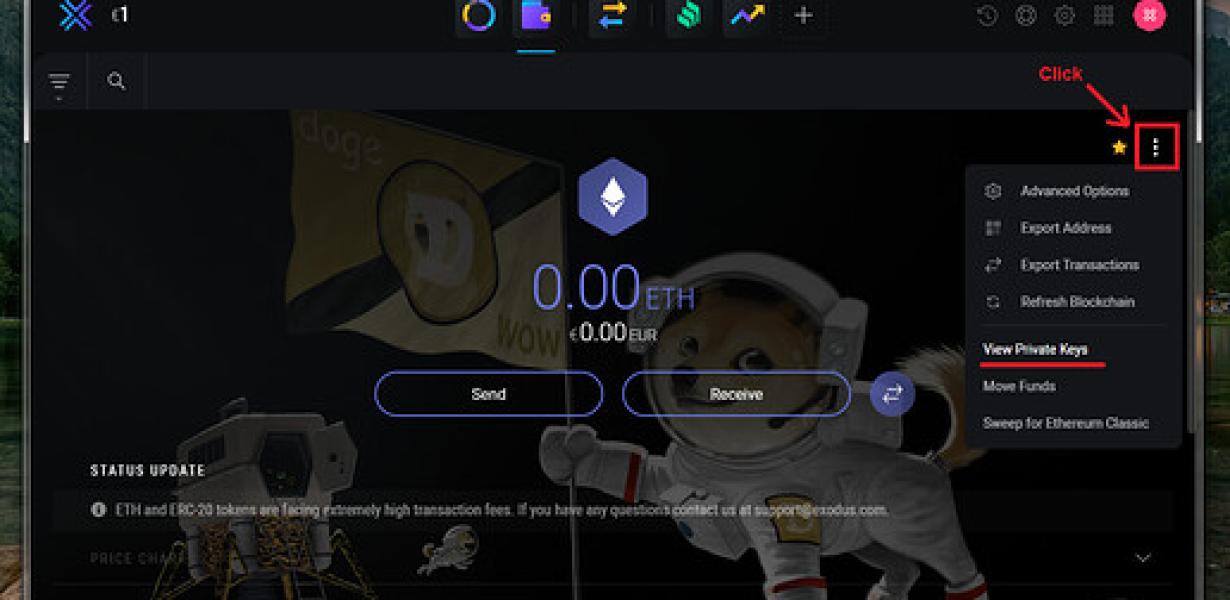
Once you have created your Exodus wallet, you will need to copy your Exodus wallet address and private key.
To get your Exodus wallet address, open your Exodus wallet and click on the "Bills" tab. Under "My Wallet Address," you will find your address.
To get your private key, open your Exodus wallet and click on the "Keys" tab. Under "My Wallet," you will find your private key.
Once you have both your Exodus wallet address and private key, you can import them into MetaMask.
To import your Exodus wallet into MetaMask, open MetaMask and click on the "Import Wallet" button.
Enter your Exodus wallet address and private key into the fields provided and click on the "Import" button.
Congratulations! You have now imported your Exodus wallet into MetaMask.