Adding Ftm To Metamask
If you're using the MetaMask browser extension, you can now add FTMs to your account! In this article, we'll show you how to do it.
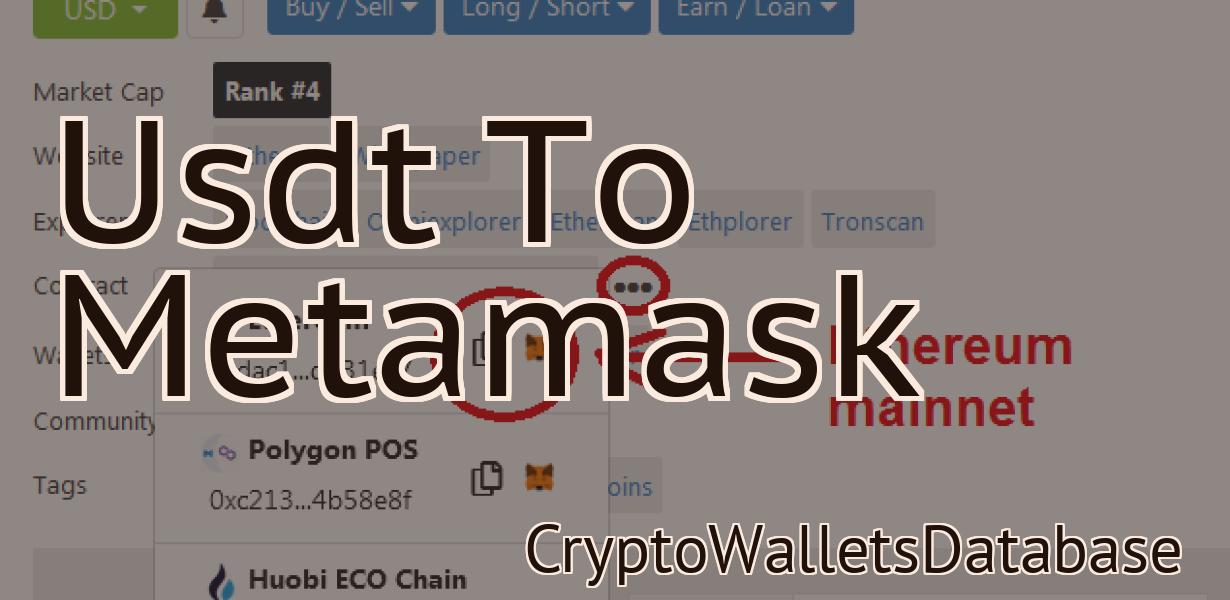
How to add an ftm token to your Metamask wallet
To add an ftm token to your Metamask wallet, you will first need to install Metamask. Once installed, you will be able to access your Metamask wallet by going to https://metamask.io/ and entering your login information.
Once inside your Metamask wallet, you will need to click on the “More” button in the top right corner of the screen and select the “Token Wallet” option.
In the Token Wallet screen, you will need to enter the following information:
1. The name of the ftm token you want to add
2. The amount of ftm tokens you want to add
3. The address of the ftm token contract
4. The gas limit of the ftm token contract
5. The expiration date of the ftm token contract
Once you have entered all of the information required, click on the “Add Token” button andMetamask will begin to load the information required to create the ftm token contract.
Once the contract has been loaded, you will need to click on the “Deploy” button to create the ftm token contract. Metamask will then ask you to provide some information about the token contract, including:
1. The name of the token
2. The symbol of the token
3. The total supply of tokens
4. The Decimals of the token
5. The activation condition of the token (this can be either “Active” or “No Activation”)
Once you have entered all of the information required, click on the “Deploy” button and the ftm token contract will be created.
Now that the ftm token contract has been created, you will need to add a token transfer function to your Metamask wallet. To do this, click on the “Add Token Function” button located in the bottom left corner of your Token Wallet screen and enter the following information:
1. The name of the token transfer function
2. The address of the token contract that will be used to transfer tokens
3. TheGas limit of the token contract that will be used to transfer tokens
4. The input data of the token transfer function (this can be either an address or a transaction hash)
5. The output data of the token transfer function (this can be an address or a transaction hash)
6. The expiration date of the token transfer function
7. The transfer data (this can be either an address or a transaction hash)
8. The confirmation data (this can be either an address or a transaction hash)
9. The function signature (this can be either a hexadecimal string or a ECDSA public key)
Once you have entered all of the required information, click on the “Add Token Function” button and Metamask will create the token transfer function.
Now that the token transfer function has been created, you will need to add an event handler to your Metamask wallet that will be used to trigger the transfer of tokens. To do this, click on the “Events” button located in the bottom right corner of your Token Wallet screen and enter the following information:
1. The name of the event handler
2. The address of the contract that will be used to trigger the transfer of tokens
3. TheGas limit of the contract that will be used to trigger the transfer of tokens
4. The input data of the event handler (this can be either an address or a transaction hash)
5. The output data of the event handler (this can be either an address or a transaction hash)
6. The expiration date of the event handler
7. The confirmations data (this can be either an address or a transaction hash)
Adding an ftm token to Metamask – a quick guide
In order to add an ftm token to Metamask, you will first need to create an account on the Fortissimo Token Management Platform. After creating your account, you will be prompted to add a new token. To add an ftm token, follow these steps:
1. Navigate to the Fortissimo Token Management Platform and click on the "Add a new token" button.
2. On the "Add a new token" page, enter the following information:
a. Name: Fortissimo Token
b. Symbol: FTM
c. Decimals: 18
3. Click on the "Create" button.
4. You will now be redirected to the Fortissimo Token Management Platform dashboard. On the dashboard, you will see your newly created ftm token. To add this token to Metamask, follow these steps:
1. Open Metamask and click on the "Token" button.
2. On the "Token" page, click on the "Add a new token" button.
3. On the "Add a new token" page, enter the following information:
a. Name: Fortissimo Token
b. Symbol: FTM
c. Decimals: 18
4. Click on the "Create" button.
5. Your newly added ftm token will now be displayed in Metamask. To use this token, follow these steps:
1. In Metamask, click on the "Configure" button.
2. On the "Configure" page, under the "Tokens" section, click on the "Add a new token" button.
3. On the "Add a new token" page, enter the following information:
a. Name: Fortissimo Token
b. Symbol: FTM
c. Decimals: 18
A step-by-step guide to adding an ftm token to your Metamask wallet
1. Open Metamask and click on the “Add Token” button.
2. On the Add Token window, enter ftm and click on the “Add” button.
3. Metamask will now generate a new token address and associated private key. Make sure to keep these safe as you will need them later.
4. To use your new ftm token, open the Metamask wallet and click on the “Token” button.
5. On the Token window, enter your ftm address and click on the “Use” button.
6. Metamask will now start sending Ethereum to your ftm address. You will see the progress of the transaction in the Token window.
7. When the transaction is complete, Metamask will display a message confirming that the ftm token has been added to your wallet.
The easiest way to add an ftm token to your Metamask wallet
1. Go to your Metamask wallet and click on the "TOKEN" button in the top right corner.
2. On the Token screen, click on the "Add a New Token" button.
3. On the Add a New Token screen, enter FTM into the Token Name field and click on the "Next" button.
4. On the FTM Token Details screen, you will need to provide some information about the FTM token. In the Token Symbol field, enter "FTM" and in the Token Decimals field, enter 18.
5. Click on the "Next" button and confirm the details of your FTM token.
6. Click on the "Add Token" button in the top right corner of the FTM Token Details screen and your FTM token will be added to your Metamask wallet.
How to add an ftm token to Metamask in just a few clicks
1. Log in to Metamask and open the Settings menu.
2. Click on the "add token" button.
3. In the "add token" dialog, you will need to provide the following information:
- Name of the token: Ftm
- Type of the token: ERC20
- Address of the token: 0xaa…
Adding an ftm token to your Metamask wallet – a simple guide
Metamask is a Ethereum-based platform that allows users to conduct Ethereum transactions with the help of a user interface and smart contracts. To add an ftm token to your Metamask wallet, follow these steps:
1. First, open your Metamask wallet and click on the “Add token” button located in the top left corner.
2. Enter the details of the ftm token you want to add and click on the “Add” button.
3. You will now be able to see the details of the ftm token in your Metamask wallet. Click on the “Token Details” button to view additional information about the token.
4. Finally, you will need to add a password for the ftm token. This password will allow you to access the token in your Metamask wallet. Click on the “Generate new password” button and enter your desired password.
A beginner's guide to adding an ftm token to Metamask
In order to add an ftm token to Metamask, you will first need to create an account on the FTM token website. Once you have created your account, you will need to input the details of your FTM token account into Metamask. To do this, open Metamask and click on the More Tools button ( represented by a gear icon in the top left corner of the Metamask window ). In the More Tools window, click on the Add Token button. In the Add Token window, you will need to input the following information: 1. Your FTM token account name
2. Your FTM token account password
3. Your Ethereum address
4. The type of token you are adding (ftm for FTM tokens)
5. The amount of tokens you are adding (This is how much FTM tokens you will be transferring to your Metamask account) After inputting the information, click on the Generate Token button. You will now see a pop-up message confirming the addition of your FTM token to your Metamask account. Finally, you will need to click on the Trust button next to the FTM token in order to enable it for use in Metamask.
How to add an ftm token to Metamask – a guide for beginners
If you want to add an ftm token to Metamask, you first need to create an account on the FTM token platform.
Once you have registered for an account, follow these steps to add an ftm token to your Metamask account:
1. Open Metamask and click on the three lines in the top left corner of the app.
2. In the pop-up menu that appears, select 'Settings'.
3. On the Settings page, under 'Token Management', click on the 'Add a Token' button.
4. In the 'Token Source' section, select 'FTM Platform'.
5. In the 'FTM Token Address' field, type in the address of your FTM token platform account.
6. In the 'FTM Token Secret Key' field, type in the secret key of your FTM token platform account.
7. Click on the 'Create' button to add your FTM token to your Metamask account.
8. Your new ftm token will now be visible in the 'Token Symbol' field of your Metamask account.