How To Add Solana To Metamask
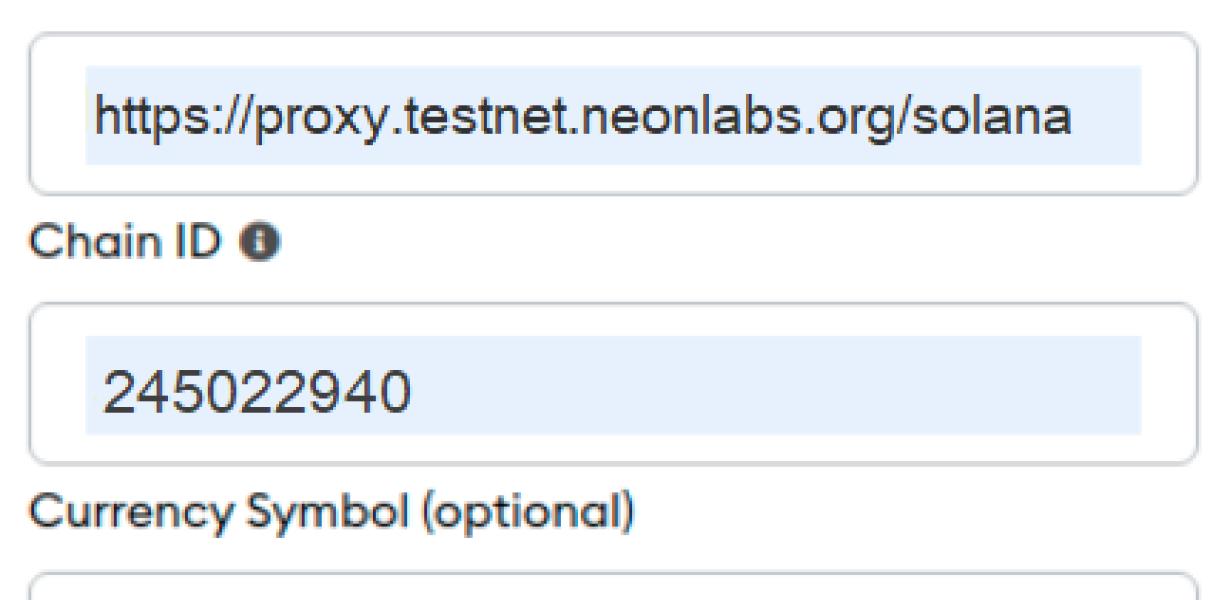
In order to add Solana to Metamask, you will first need to create a wallet with the Solana Core Wallet. Once you have created a wallet, you will need to export your private key from the Solana Core Wallet. Next, you will need to import your private key into Metamask. Finally, you will need to add the Solana Testnet RPC URL to Metamask.
How to Add Solana to Metamask
To add Solana to Metamask, first open the Metamask app on your computer.
Then, click the three lines in the top left corner of the app.
On the "Add Wallet" page, click the "Metamask" button.
On the "Add Wallet" page, click the "Solana" button.
Enter your Metamask address and password, and click the "Next" button.
On the "Verification" page, enter your Solana address and click the "Next" button.
On the "Confirm" page, click the "Next" button.
Your Solana account has now been added to Metamask!
Adding Solana to Metamask
To add Solana to Metamask, open the Metamask app and click on the three lines in the top right corner. On the left side, select "Add account." In the "Account name" field, type Solana. In the "Email address" field, type solana@solana.io. In the "Security question" field, type What is the capital of Portugal? Click on the "Create account" button.
After adding Solana to Metamask, you will need to configure a few settings in order for it to work. First, open the Settings menu in Metamask and click on "Accounts." In the "Accounts" page, click on the "Solana" account and then click on the "Settings" button in the bottom right corner. In the "Settings" page, click on the "Gas Limit" button and set the gas limit to 3000 SST. Click on the "Token Issuer" button and set the token issuer to "solana.io." Finally, click on the "Save Changes" button.
Now that Solana has been added to Metamask, you can start using it to trade Ethereum and other cryptocurrencies.
How to Use Solana with Metamask
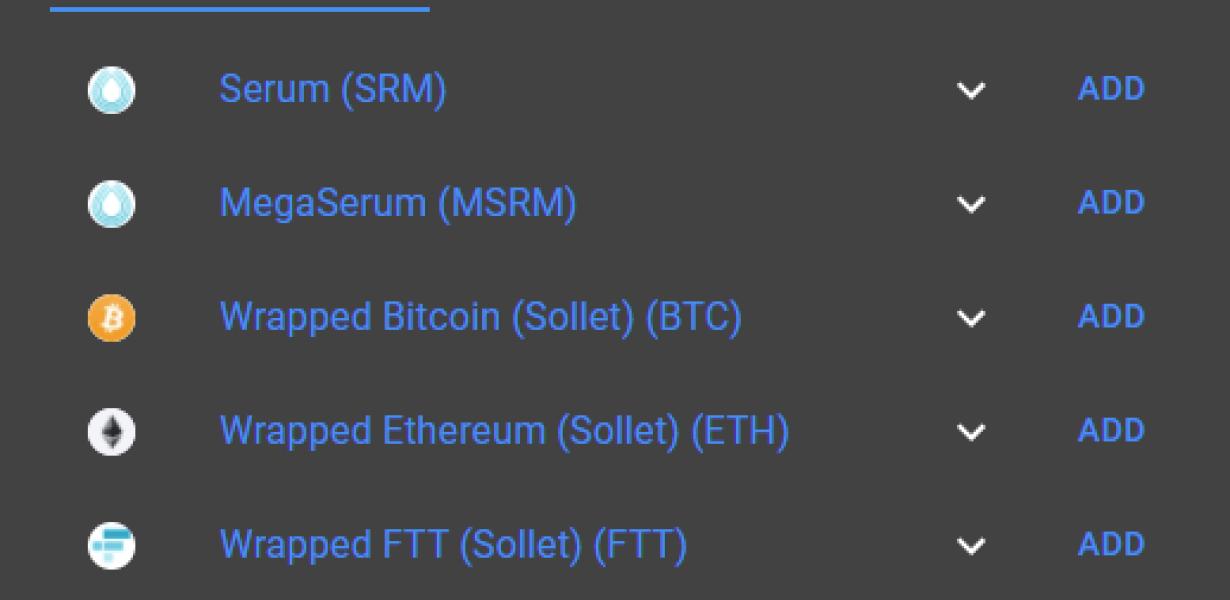
To use Solana with Metamask, you first need to install the Metamask extension. After that, you can add a custom token to your Metamask account.
To add a custom token, open Metamask and click on the "New Token" button. Enter the token name, description, and other details, and click on the "Create" button.
You can then use the token in Solana by adding it to your account's settings. To do this, open Solana and click on the "Settings" button. Under "Accounts", click on the "Add Account" button. Enter the account name and password, and then click on the "Import Custom Token" button. Select the custom token from Metamask, and click on the "OK" button.
Using Solana with Metamask
As mentioned earlier, Solana is a decentralized platform that allows you to create and manage your own blockchain applications.
To use Solana with Metamask, you first need to download and install Metamask. After that, you can add Solana to your Metamask account.
Once you have added Solana, you can start creating your own blockchain applications. To do this, you will first need to create a new project.
After you have created your project, you will need to add a blockchain application. To do this, you will need to click on the “Add Blockchain Application” button in the upper left corner of your project page.
After you have added your blockchain application, you will need to configure it. To do this, you will need to click on the “Configure” button in the upper right corner of your project page.
After you have configured your blockchain application, you will need to add nodes. To do this, you will need to click on the “Nodes” button in the upper right corner of your project page.
After you have added nodes, you will need to configure them. To do this, you will need to click on the “Configure Nodes” button in the lower right corner of your project page.
After you have configured your nodes, you will need to add a transactions folder. To do this, you will need to click on the “Add Transactions Folder” button in the lower left corner of your project page.
After you have added the transactions folder, you will need to add a contracts folder. To do this, you will need to click on the “Add Contracts Folder” button in the lower right corner of your project page.
After you have added the contracts folder, you will need to add a data folder. To do this, you will need to click on the “Add Data Folder” button in the lower right corner of your project page.
After you have added the data folder, you will need to add a files folder. To do this, you will need to click on the “Add Files Folder” button in the lower right corner of your project page.
After you have added the files folder, you will need to add a database folder. To do this, you will need to click on the “Add Database Folder” button in the lower right corner of your project page.
After you have added the database folder, you will need to add a config file. To do this, you will need to click on the “Add Config File” button in the lower right corner of your project page.
After you have added the config file, you will need to add a solana.json file. To do this, you will need to click on the “Add Solana File” button in the lower right corner of your project page.
After you have added the solana.json file, you will need to add a deploy script. To do this, you will need to click on the “Add Deploy Script” button in the lower right corner of your project page.
After you have added the deploy script, you will need to add a web3.js file. To do this, you will need to click on the “Add Web3 File” button in the lower right corner of your project page.
After you have added the web3.js file, you will need to add a solana-node.js file. To do this, you will need to click on the “Add Solana Nodejs File” button in the lower right corner of your project page.
After you have added the solana-node.js file, you will need to add a solana-cli.js file. To do this, you will need to click on the “Add Solana CLI File” button in the lower right corner of your project page.
After you have added the solana-cli.js file, you will need to add an index.js file. To do this, you will need to click on the “Add Index File” button in the lower right corner of your project page.
After you have added the index.js file, you will need to add a runtime.config.js file. To do this, you will need to click on the “Add Runtime Config File” button in the lower right corner of your project page.
After you have added the runtime.config.js file, you will need to add a start script. To do this, you will need to click on the “Add Start Script” button in the lower right corner of your project page.
After you have added the start script, you will need to add a deploy script. To do this, you will need to click on the “Add Deploy Script” button in the lower right corner of your project page.
After you have added the deploy script, you will need to add a solana-config-file.js file. To do this, you will need to click on the “Add Solana Config File” button in the lower right corner of your project page.
After you have added the solana-config-file.js file, you will need to add a solanas-configuration-sample-configuration-file.json file. To do this, you will need to click on the “Add Solanas Configuration Sample Configuration File” button in the lower right corner of your project page.
After you have added the solanas-configuration-sample-configuration-file.json file, you will need to add a solanas-configuration-sample-configuration-file.js file. To do this, you will need to click on the “Add Solanas Configuration Sample Configuration File” button in the lower right corner of your project page.
After you have added the solanas-configuration-sample-configuration-file.js file, you will need to add a solanas-configuration-sample-configuration-file.xml file. To do
How to Connect Solana to Metamask
Solana is a decentralized application platform that enables users to build, run and manage applications on the blockchain. To connect Solana to Metamask, follow these steps:
1. Open Metamask and click on thethree lines in the top right corner.
2. In the "Add New Add-on" section, click on the "Web3" icon.
3. In the "Add Web3 Provider" window, paste the following URL into the "Provider Address" field and click on the "Add" button: https://mainnet.solana.io
4. In the "Add Web3 Provider" window, click on the "Metamask" button.
5. In the "Add Custom Token" window, paste the following JSON into the "Token" field and click on the "Add" button:
{ "name": "SOLANA", "symbol": "SOL", "decimals": 18 }
6. In the "Add Custom Token" window, click on the "Metamask" button.
7. In the "Configure Rules" window, click on the "Add Rule" button.
8. In the "Add Rule" window, paste the following JSON into the "Condition" field and click on the "Add" button:
{"from": "0x0000000000000000000000000000000000000000", "to": "0x0000000005a7aaefc00000000"}
9. In the "Add Rule" window, click on the "Ok" button.
10. In the "Configure Rules" window, click on the "Ok" button.
11. In the "MetaMask" window, click on the "Connect" button.
Connecting Solana to Metamask
Solana is an Ethereum-based platform that allows users to manage their digital assets. Metamask is a browser extension that allows users to interact with the Ethereum network. You can connect Solana to Metamask by following these steps:
1. Open the Metamask extension on your browser.
2. Click on the three lines in the top left corner of the Metamask window.
3. Select “Connect to networks.”
4. Select “Ethereum (Mainnet).”
5. Click on the blue “Connect” button.
6. Enter your Solana credentials in the “Solana” field and click on the “Connect” button.
7. Your Solana account will be connected to your Metamask account.
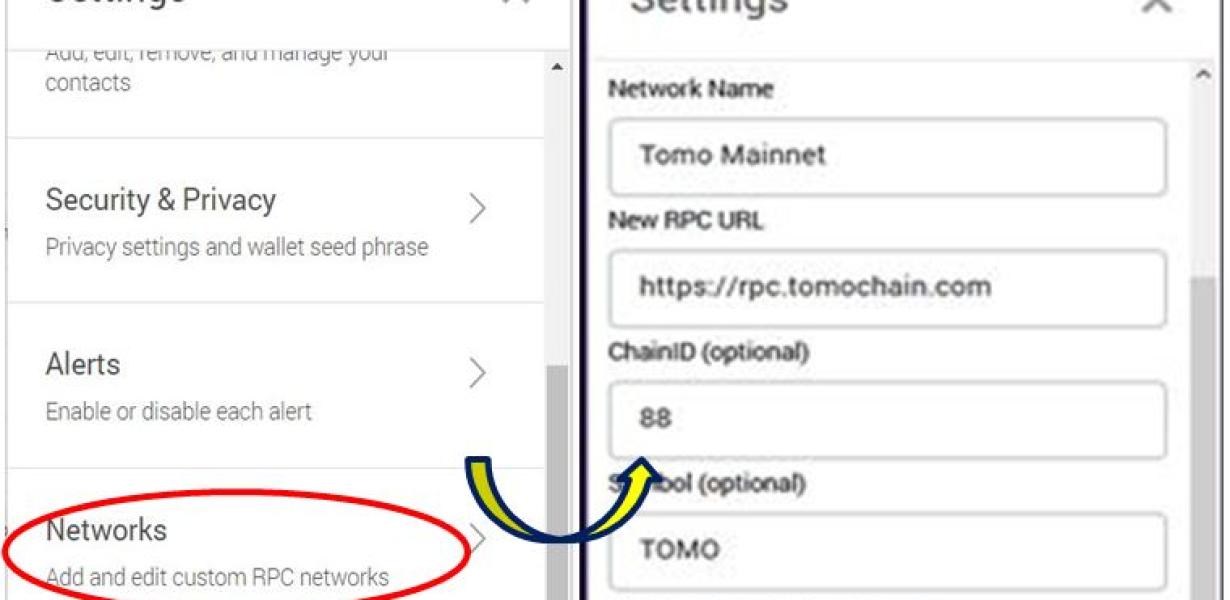
How to Configure Solana on Metamask
1. Go to the Metamask website and click on the “Add New Wallet” button.
2. On the “Add New Wallet” page, click on the “Solana” icon.
3. On the “Solana” page, click on the “Configure” button.
4. On the “Configure” page, you will need to enter your Solana address and password. You can also select how you want your wallet to be saved (Ethereum or ERC20 token).
5. Click on the “Save” button to finish configuring your Solana wallet.
Configuring Solana on Metamask
To configure Solana on Metamask, follow these steps.
1. Open Metamask and click on the three lines in the top right corner.
2. Click on "Add New Account" and enter the following details:
Name: solana
Email: solana@metamask.io
3. Click on "Connect" and Solana will be added to your Metamask account.
4. Click on the "Configure" button next to Solana and the following dialog will appear:
5. In the "Configure Solana" dialog, you can set the following options:
Domain: This is the domain name or IP address of your Solana instance.
Port: The port that your Solana instance will use.
6. Click on the "Save" button to save your changes.
7. To start using Solana, launch the Solana instance by clicking on the "Start" button next to it.
How to Set Up Solana on Metamask
1. First, open the Metamask wallet and click on the “Add a Token” button.
2. Search for Solana and click on the “Add” button.
3. Enter your details and click on the “Save” button.
4. Next, you will need to activate your Solana account. To do this, open the Metamask wallet and click on the “Token Activation” button.
5. Scroll down and click on the “Activate My Account” button.
6. Enter your details and click on the “Submit” button.
7. Your Solana account is now activated! To continue setting up your account, open the Metamask wallet and click on the “Settings” button.
8. On the “Settings” page, click on the “Solana” tab.
9. On the “Solana” tab, you will need to verify your identity. To do this, click on the “Verify Identity” button and follow the instructions on the screen.
10. Finally, you will need to set up your Solana wallet address. To do this, click on the “Wallets” button and select your Solana wallet from the list.
11. Next, you will need to set up your Solana password. To do this, click on the “Passwords” button and enter your password into the field below.
12. Click on the “Save” button to finish setting up your Solana account!
Setting Up Solana on Metamask
To use Solana on Metamask, you’ll first need to set up a Metamask account. After acquiring a Metamask account, you can then install the Solana extension.
Once you have installed the Solana extension, open Metamask and click on the three lines in the top right corner. Then, click on the “Extensions” tab. Next, click on the “Add new extension” button and select the “Solana” option.
After selecting the “Solana” extension, you will be prompted to provide some information about the extension. In particular, you will need to provide a name for the extension and an icon. Finally, you will need to provide a description of the extension.
Once you have completed the information required for the extension, click on the “Create” button. After clicking on the “Create” button, you will be taken to the extension overview page.
On the extension overview page, you will see a list of all of the actions that are available for the Solana extension. The actions that are available for the Solana extension include:
Creating a new Solana account
Logging in to a Solana account
Logging in to a Solana account with Metamask
Creating a new Solana transaction
Creating a new Solana contract
Adding a comment to a Solana contract
Deleting a comment from a Solana contract
Viewing the Solana contracts that are currently active
Viewing the transactions that are currently active in a Solana contract
Viewing the accounts that are currently associated with a Solana contract
Viewing the comments that are currently attached to a Solana contract
In addition, the extension overview page also includes information about the pricing structure for the Solana extension. Specifically, the extension overview page includes:
The cost of a new Solana account
The cost of logging in to a Solana account
The cost of logging in to a Solana account with Metamask
The cost of creating a new Solana transaction
The cost of creating a new Solana contract
The cost of adding a comment to a Solana contract
The cost of deleting a comment from a Solana contract
The cost of viewing the contracts that are currently active in a Solana contract
The cost of viewing the transactions that are currently active in a Solana contract
The cost of viewing the accounts that are currently associated with a Solana contract
How to Install Solana on Metamask
To install Solana on Metamask, open the Metamask app and click on the three lines in the top right corner. Then, click on the "Add a New Wallet" button.
Next, enter Solana's address into the "Send Ether to" field and click on the "Create Transaction" button.
Finally, click on the "Metamask Icon" in the bottom left corner of the screen to open the Metamask app. Then, click on the "Ether Wallet" icon and click on the "Add Token" button.
Next, enter Solana's contract address into the "Token Contract Address" field and click on the "Create Transaction" button.
Finally, click on the "Metamask Icon" in the bottom left corner of the screen to open the Metamask app. Then, click on the "Token Wallet" icon and click on the "Add Token" button.
Installing Solana on Metamask
1. Go to https://metamask.io/ and login with your Metamask credentials.
2. Click on the "Add a new application" button in the top left corner of the page.
3. In the "Add a new application" window, find and click on the "Solana" button.
4. On the "Solana" window, click on the "Configure" button.
5. On the "Configure" window, click on the "Add a new token" button.
6. In the "Add a new token" window, input the following information:
• Name: solana
• Token type: ERC20
7. Click on the "Save" button to save the token.
8. On the "Solana" window, click on the "Token details" button.
9. On the "Token details" window, find and click on the "Access token" button.
10. On the "Access token" window, input the following information:
• Token grant type: Bearer
11. Click on the "Save" button to save the access token.
12. On the "Solana" window, click on the "Deploy" button.
13. On the "Deploy" window, input the following information:
• Contract address: 0x0d5c5cc199f24d0a
• Token address: 0x0d5c5cc199f24d0a
14. Click on the "Deploy" button to deploy the contract.
15. On the "Solana" window, click on the "Monitor" button.
16. On the "Monitor" window, you will see information about the contract deployment and the access token issuance.