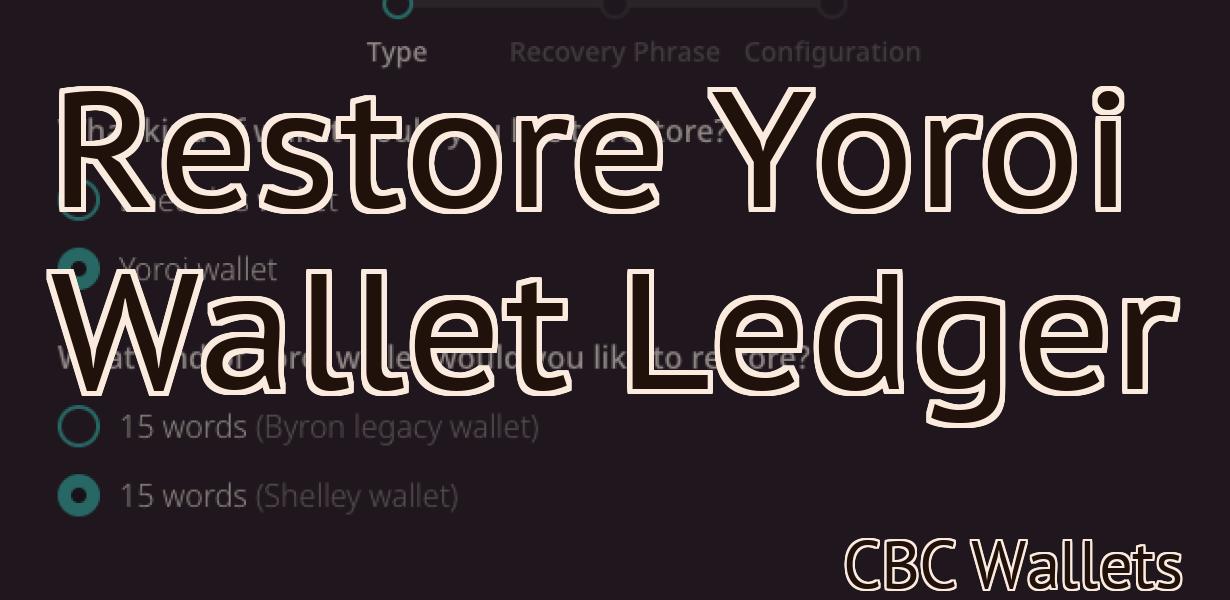
How to add avalanche to Metamask.
If you're looking to add some extra security to your Metamask account, you can do so by enabling the "Avalanche" option. This will add an additional layer of protection to your account, making it more difficult for hackers to gain access. Here's how to enable Avalanche in Metamask: 1. Open Metamask and click on the settings icon in the top-right corner. 2. Select "Security & Privacy" from the menu. 3. Scroll down to the "Avalanche" section and toggle the switch to "On". 4. That's it! Your Metamask account is now more secure thanks to the added Avalanche protection.
How to Add Avalanche to Metamask
To add Avalanche to your Metamask account, open the Metamask app and click on the "Add" button in the top right corner. From there, select the "Avalanche" token from the list of available tokens. Next, enter your Metamask address and click "Next." Finally, confirm the addition by clicking on the "Finish" button.
Adding Avalanche to Metamask
If you want to use Avalanche with Metamask, you first need to install the Metamask extension.
After installing the Metamask extension, open it and click on the Add New Account button.
In the new window that pops up, enter the following information:
Name: Avalanche
Email: [email protected]
Token: xxxxxxxxxxxxxxxxxxxxxxxxxxxxxx
After filling out all the required fields, click on the Next button.
On the next screen, Metamask will ask you to select a provider. Click on the Plus button next to Ethereum and select the correct network.
After selecting the correct network, Metamask will ask you to provide a password. Make sure to remember this password!
Next, Metamask will ask you to authorize the account. Click on the Authorize button and confirm your account by clicking on the Activate button.
Now you're ready to start using Avalanche with Metamask!
How to Use Avalanche with Metamask
1. Load the Metamask wallet and open it.
2. Click on the "Avalanche" icon in the bottom right corner.
3. Select the alt coins you want to trade with.
4. On the left side of the screen, click on the "BUY" button.
5. Enter the amount of alt coins you want to buy and click on the "BUY" button.
6. On the right side of the screen, click on the "SELL" button.
7. Enter the amount of alt coins you want to sell and click on the "SELL" button.
8. Click on the green "TRADE" button.
Using Avalanche with Metamask
Avalanche is a decentralized application (DApp) that allows users to create and manage their own personal blockchain networks. With Metamask, you can easily access and use the functionality of Avalanche to manage your own personal blockchain network.
How to Connect Avalanche with Metamask
1. Launch the Metamask app on your desktop or mobile device.
2. Click on the "Add New Account" button in the top left corner of the Metamask main screen.
3. Type in "Avalanche" in the "Account Name" field and click on the "Create Account" button.
4. In the "Keys" field, paste in the following address:
https://accounts.metamask.io/Avalanche
5. Click on the "Connect" button to finish setting up your connection to Avalanche.

Connecting Avalanche with Metamask
To connect Avalanche with Metamask, open up Metamask and click on the "Add Wallet" button in the top right corner. From here, input the following information:
1. Name: Avalanche
2. Address: 0xDd5c5C5C5C5C5C5C5C5C5C5C5C5C5C5C5C5C5
3. Token Symbol: AVAL
4. Decimals: 18
5. Click on the "Connect" button.
6. You will now be presented with a "Success!" message, which means that the connection was successful.
How to Install Avalanche on Metamask
1. Open the Metamask Chrome extension.
2. Click on the "Settings" button located in the top right corner of the extension's interface.
3. Click on the "Add New Account" button.
4. Enter the details of the new account, such as its name and email address.
5. Click on the "Create Account" button.
6. Click on the "Avalanche" button in the "My Accounts" section of the Metamask settings.
7. Click on the "Configure" button.
8. Select the "Avalanche" blockchain network from the list of networks that appears.
9. Enter your address and other required information.
10. Click on the "Configure" button again.
11. Select the "Avalanche" wallet from the list of wallets that appears.
12. Click on the "Configure" button again.
13. Select the "Avalanche" token from the list of tokens that appears.
14. Click on the "Configure" button again.
15. Select the "Avalanche" network from the list of networks that appears.
16. Click on the "OK" button to finish configuring Avalanche on Metamask.
Installing Avalanche on Metamask
1. First, open Metamask and register for a new account.
2. Navigate to the "Extensions" tab in Metamask and search for "Avalanche."
3. Click on the "Install" button next to Avalanche.
4. Once the extension is installed, click on the "Activate" button to enable it.
5. Navigate to the "Settings" tab in Avalanche and click on the "Add User" button.
6. Enter the following information into the "User Name" and "Password" fields and click on the "Create Account" button.
7. Click on the "Log Out" button at the top of the Avalanche screen to exit Metamask.
8. Navigate to the "Avalanche" extension in your browser and click on the "Start Mining" button to begin mining Ethereum.