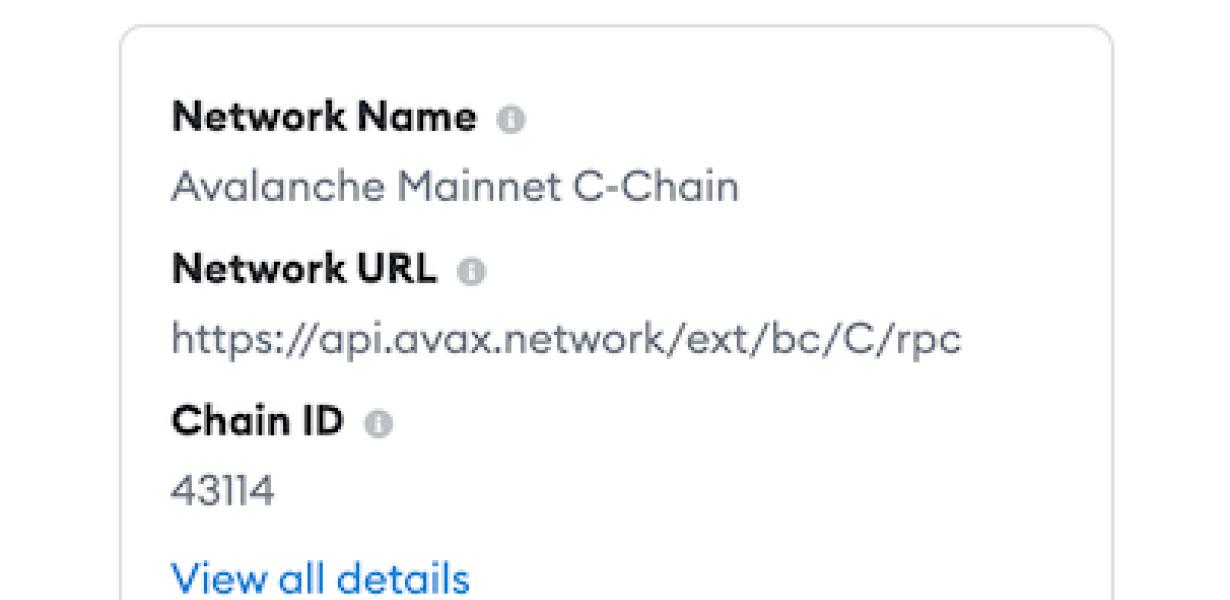
Avalanche Network On Metamask
Metamask is a browser extension that allows you to run Ethereum dapps without having to run a full Ethereum node. Avalanche is a decentralized network that connects blockchains, smart contracts, and dapps. The Avalanche Network On Metamask allows you to connect to the Avalanche network and interact with dapps built on the network.
How to Use an Avalanche Network on Metamask
1. Install Metamask on your computer.
2. Open Metamask and connect to the Avalanche network.
3. In the left panel, click the blue "Avalanche" button.
4. In the "Avalanche Network" window, click the "Create New Account" button.
5. Enter your Metamask address and click the "Create Account" button.
6. In the "Avalanche Account" window, click the "Add Deposit" button.
7. In the "Add Deposit" window, enter the amount of Ethereum you want to deposit and click the "Add Deposit" button.
8. In the "Avalanche Account" window, you will see your Ethereum deposit address. You can now send Ethereum to this address.
Getting Started with an Avalanche Network on Metamask
To get started with an Avalanche Network on Metamask, you need to first install Metamask. Metamask is a browser extension that allows you to conduct transactions with the Ethereum network. After installing Metamask, you can visit the Metamask website to create a new account.
Once you have created an account, you can access the Avalanche Network by clicking on the "Avalanche Network" button on the Metamask home page. On the Avalanche Network page, you will need to input your address and password to join the network. After you have joined the network, you will be able to start participating in transactions.
Using an Avalanche Network on Metamask
If you have an account with the Avalanche Network, you can use Metamask to access their dapps.
First, open Metamask and click on the three lines in the top right corner.
Click on "Add a Dapp."
In the "Dapp Type" dropdown, select "Avalanche Network."
In the "Dapp URL" field, paste the following address: https://api.avalanche.network
In the "Token Address" field, paste the following address: 0x37b3f3a3ccee0d7ffc8f11e9ebb6188b5e50e8c1baa
Click on "Create."
Once the Dapp has been added, you will be taken to the Dapp's Overview page.
On this page, you will see information about the Dapp, such as its name and logo.
To start using the Dapp, you will first need to set up an account with it. To do this, click on the "Register" link next to the "Name" field.
Enter your desired username and password in the fields that appear, and click on "Register."
Once you have registered for the Dapp, you will be able to access it by clicking on the "Home" link in the Overview page.
On the Home page, you will see a list of the Dapps that are available on the Avalanche Network.
To start using one of the Dapps, click on its name.
This will take you to the Dapp's main screen. On this screen, you will see a list of services that the Dapp provides.
To use one of these services, click on it. This will take you to a screen where you can enter your details.
Once you have entered your details, click on "Next."
This will take you to a screen where you can decide how you want to pay for the service.
To pay for the service, click on the "Pay With" link next to the payment option that you want to use.
This will take you to a screen where you can enter your payment details.
Once you have entered your payment details, click on "Next."
This will take you to a screen where you can review your purchase.
If everything is correct, click on "Next."
This will take you to a screen where you can download the service.
Once the service has been downloaded, click on "Finish."
Tips for Using an Avalanche Network on Metamask
1. Create an account on the Avalanche Network and install the Metamask Chrome extension.
2. Activate your Avalanche Network account by clicking on the "Activate My Account" button in the header of the Metamask extension.
3. Enter your Metamask address and password in the "Avalanche Network Login" fields and click on the "Login" button.
4. Under "My Accounts", find the "Avalanche Network" account and click on the "View Account Info" button.
5. Under "Account Details", find the "Send & Receive" section and click on the "Enable Send & Receive" button.
6. Add addresses to your Avalanche Network account by clicking on the "Add Address" button and entering the address of the recipient in the "Address" field.
7. Click on the "Enable Send & Receive" button to confirm that your address has been added to the account.
8. Click on the "Send" button to send a transaction to a recipient address.
9. Click on the "Receive" button to receive a transaction from a recipient address.
How to Get the Most Out of an Avalanche Network on Metamask
There are a few things you can do to get the most out of your Avalanche Network on Metamask.
1. Make sure you have Metamask installed and open.
2. Click the "Avalanche" button in the upper right corner of the Metamask window.
3. In the "Avalanche" window, click the "Configure" button.
4. In the "Configure" window, click the "Add Node" button.
5. In the "Add Node" window, enter the address of the Avalanche Network node you want to connect to.
6. In the "Port" field, enter the port number of the node.
7. In the "Path" field, enter the path to the node's blockchain file.
8. In the "Token Contract Address" field, enter the address of the token contract for the node.
9. Click the "Connect" button.
10. If the connection is successful, the "Node Connected" message will be displayed in the "Configure" window.
Making the most of an Avalanche Network on Metamask
Metamask is a great tool for managing your cryptocurrency holdings. One of the best features of Metamask is the Avalanche Network. The Avalanche Network is a decentralized network that allows you to quickly and easily trade cryptocurrencies with other users.
One way to make the most of the Avalanche Network on Metamask is to use it to trade cryptocurrencies. You can trade cryptocurrencies on the network using Metamask’s built-in trade function. You can also use the network to quickly and easily buy cryptocurrencies.
If you want to use the Avalanche Network to store your cryptocurrencies, you can use Metamask to create a cold storage wallet. You can use the network to store your cryptocurrencies in a secure wallet. You can also use the network to sell cryptocurrencies.
Optimizing an Avalanche Network on Metamask
Metamask is a decentralized platform that allows you to create, manage and use digital identities. It provides a user interface for managing your personal data, as well as allowing you to access decentralized applications (DApps) and smart contracts.
If you want to optimize your Avalanche Network on Metamask, you'll first need to create a new account. After you've created your account, you'll need to add a new wallet. To do this, open the Metamask app and click on the "Add Wallet" button. Next, input the address of your new Avalanche Network wallet and click on the "Create Wallet" button.
Once you've added your new wallet, you'll need to configure it. To do this, open the Metamask app and click on the "Configure Wallet" button. Next, you'll need to choose a password and select your language. You'll also need to choose a Gas Limit and Gas Price. Finally, you'll need to input your public key.
Now that your Avalanche Network wallet is configured, you'll need to add some tokens to it. To do this, open the Metamask app and click on the "Token Addresses" button. Next, input the address of the token you want to add to your wallet and click on the "Add Token" button.
After you've added the token to your wallet, you'll need to create a transaction. To do this, open the Metamask app and click on the "Transactions" button. Next, you'll need to choose the token you want to send and the address of the recipient. You'll also need to choose the Gas Limit and Gas Price. Finally, you'll need to input the amount of tokens you want to send and the block height at which you want the transaction to be processed.
Now that your Avalanche Network wallet is optimized, you're ready to start trading! To do this, open the Metamask app and click on the "Exchange" button. Next, you'll need to choose the token you want to trade and the address of the exchange. You'll also need to choose the price at which you want to trade the token and the number of tokens you want to trade. Finally, you'll need to input the amount of Avalanche Network tokens you want to trade.
Thanks for reading! If you have any questions, please feel free to ask in the comments section below or on our Facebook page.
Troubleshooting an Avalanche Network on Metamask
If you are experiencing issues with your Avalanche Network, there are a few things you can do to troubleshoot the issue.
1. Check for Metamask Connections
Make sure that you have connected to the Avalanche Network and that your Metamask is up-to-date. If you are unable to connect to the network, check to make sure that your computer and Metamask are both connected to the same network.
2. Clear Your Browser Cache
If you are still having trouble connecting to the network, clearing your browser cache may help. To do this, open your browser and go to the settings tab. Under “History,” select “Clear Recent History.” This will remove all of the data from your browser history, including any information related to the Avalanche Network.
3. Check Your Connection Settings
If you are still having trouble connecting to the network, make sure that your connection settings are correct. To do this, click on the “Settings” button in the top right-hand corner of your screen and select “Network & Internet.” Under “Connection Settings,” make sure that your computer is connected to the internet and that your network is active. If you are still having trouble connecting, please reach out to our support team for assistance.