Metamask Uniswap
Metamask is a browser extension that allows you to interact with decentralized applications (dApps) on the Ethereum network. Uniswap is a decentralized exchange built on the Ethereum network that allows users to trade Ethereum tokens.
Metamask and Uniswap: The perfect combination for your crypto needs!
If you’re looking for a way to securely manage your crypto holdings, look no further than Uniswap and Metamask. These two platforms work together to provide a safe and secure way to store and use your cryptocurrencies.
Uniswap is a platform that allows you to exchange cryptocurrencies with other users in a trustless manner. This means that you don’t have to trust the other user to hold onto their coins properly. Metamask is a platform that allows you to securely store your cryptocurrencies and use them in the same manner as traditional digital wallets. This means that you can access your coins anywhere there is an internet connection.
Combining Uniswap and Metamask provides the ultimate security for your crypto holdings. With Uniswap, you can safely exchange your coins with other users, while Metamask keeps your coins safe and secure.
Metamask: The ultimate guide to using Uniswap
Uniswap is a decentralized trading platform that allows users to trade cryptocurrencies and tokens directly. It’s designed to provide a trustless and secure trading experience, and it has a wide range of features that make it an excellent choice for traders. In this guide, we’ll outline everything you need to know about using Uniswap, from setting up an account to trading cryptocurrencies and tokens.
How Uniswap works
Uniswap is a decentralized trading platform that uses the blockchain technology to provide a trustless and secure trading experience. Users can trade cryptocurrencies and tokens directly without having to go through a third party.
Setting up an account on Uniswap
To set up an account on Uniswap, you first need to create a username and password. After you have created your account, you will need to Input your personal information, including your email address and a valid phone number. You will also need to verify your email address by entering your verification code into the provided field.
Once you have completed the registration process, you will be able to access your account dashboard. In the dashboard, you will find all of the information you need to start trading cryptocurrencies and tokens.
Trading cryptocurrencies and tokens on Uniswap
To start trading cryptocurrencies and tokens on Uniswap, you first need to open a trading account. After you have opened a trading account, you will be able to trade any of the supported cryptocurrencies and tokens.
To trade cryptocurrencies and tokens on Uniswap, you will need to first identify the cryptocurrency or token you want to trade. You can find all of the supported cryptocurrencies and tokens in the trading section of your account dashboard.
After you have identified the cryptocurrency or token you want to trade, you will need to select the currency you want to use in your trade. You can find the list of supported currencies in the currency section of your account dashboard.
After you have selected the currency you want to use, you will need to enter the amount of cryptocurrency or token you want to trade. You can find the amount of cryptocurrency or token you want to trade in the trading section of your account dashboard.
After you have entered the amount of cryptocurrency or token you want to trade, you will need to select the market channel you want to use in your trade. You can find the list of market channels in the trading section of your account dashboard.
After you have selected the market channel you want to use, you will need to enter the buy or sell order price. You can find the buy or sell order price in the trading section of your account dashboard.
After you have entered the buy or sell order price, you will need to enter the amount of time that you want to wait for your order to be executed. You can find the amount of time that you want to wait for your order to be executed in the trading section of your account dashboard.
After you have entered the amount of time that you want to wait for your order to be executed, you will need to enter the cryptocurrency or token that you want to receive as payment for your trade. You can find the cryptocurrency or token that you want to receive as payment for your trade in the receiving section of your account dashboard.
After you have entered the cryptocurrency or token that you want to receive as payment for your trade, you will need to enter the address where you want the cryptocurrency or token to be sent. You can find the address where you want the cryptocurrency or token to be sent in the receiving section of your account dashboard.
After you have entered the address where you want the cryptocurrency or token to be sent, you will need to click submit order. You will then be able to view your order details, including the buy or sell order status and the payment received for your trade.
If you have any questions about using Uniswap, feel free to contact us at [email protected].
How to use Metamask and Uniswap together
To use Metamask and Uniswap together, you first need to create an Uniswap account. After you've created your Uniswap account, you need to install Metamask. After you've installed Metamask, you can start using it to exchange tokens.
The benefits of using Metamask and Uniswap
Metamask and Uniswap are two of the most popular blockchain wallets on the market. They offer a number of benefits that make them great options for storing and using cryptocurrency.
First, Metamask and Uniswap offer user anonymity. This is thanks to the fact that they use the Tor network to protect users' identities. This makes them a great option for those who want to stay anonymous when trading or spending their cryptocurrency.
Second, Metamask and Uniswap offer a number of different features that make them great wallets for trading and investing in cryptocurrency. They offer support for a wide range of cryptocurrencies, including Bitcoin, Ethereum, and Litecoin. This means that they are perfect for those who want to invest in a variety of different cryptocurrencies.
Finally, Metamask and Uniswap are both easy to use. This means that they are perfect for those who want to quickly and easily start using cryptocurrency.
How to get started with Metamask and Uniswap
1. First, download Metamask and Uniswap.
2. Open Metamask and click on the "Create New Wallet" button.
3. Enter your Uniswap account name and password.
4. Click on the "Create New ERC20 Wallet" button.
5. In the "Token Address" field, enter the address of the token you want to swap.
6. In the "Token Symbol" field, enter the symbol of the token you want to swap.
7. Click on the "Swap Tokens" button.
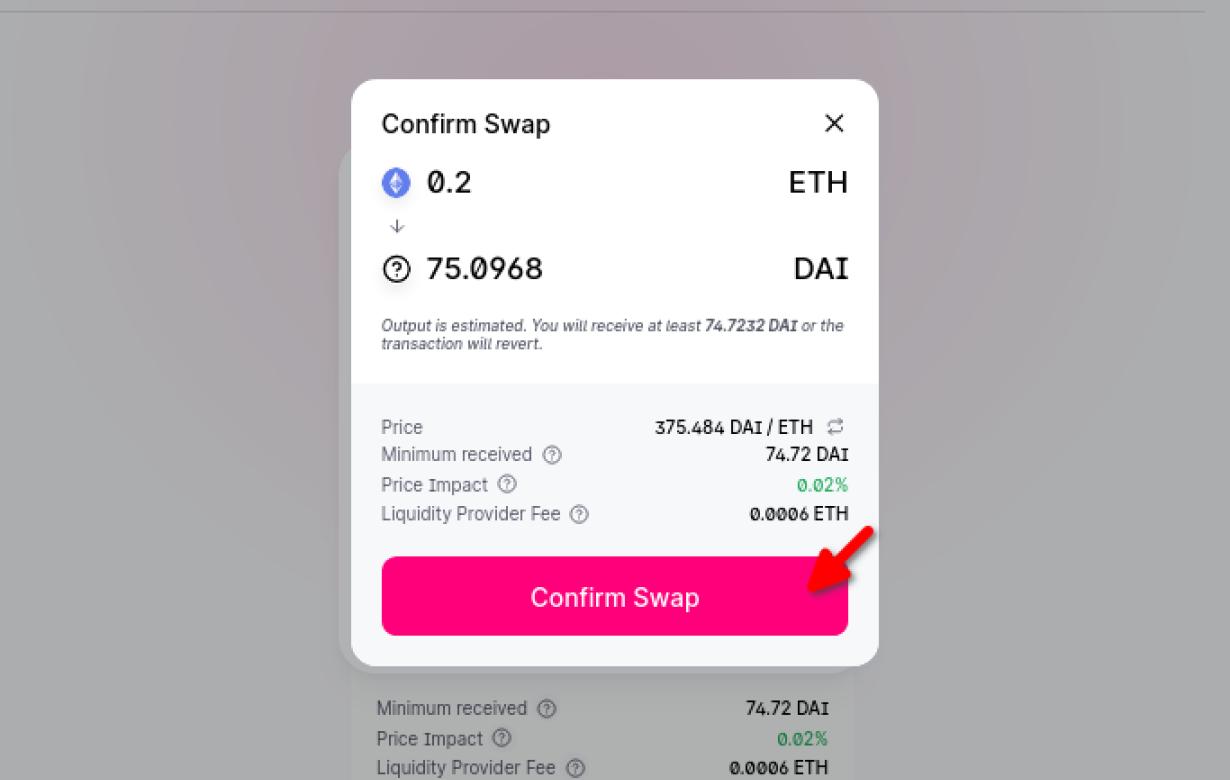
8. In the "Confirm Swap" field, click on the "Swap Now" button.
9. You will receive a notification in Metamask confirming the swap has been completed.
Metamask and Uniswap: A step-by-step guide
If you want to use Uniswap and Metamask together, here's a step-by-step guide:
1. Install Metamask and Uniswap on your computer.
2. Connect to your Uniswap account using Metamask.
3. Open the Uniswap app.
4. Click on the “Waves” button in the top left corner.
5. Click on the “Uniswap” button in the top right corner.
6. Click on the “Metamask” button in the bottom right corner.
7. Click on the “Add Custom Token” button.
8. Enter the token you copied from your Metamask account into the “Token” field.
9. Click on the “Add” button.
10. Click on the “Uniswap” button in the top right corner.
11. Click on the “Metamask” button in the bottom right corner.
12. Click on the “Send ERC20 Token” button.
13. You will now see your ERC20 token in the “Token” field of the Uniswap app.
Metamask and Uniswap: The ultimate how-to guide
Uniswap is a decentralized trading platform that uses the Ethereum blockchain. You can use Uniswap to buy and sell Ethereum, Bitcoin, and Litecoin using cryptocurrencies.
Metamask is a Chrome extension that enables you to interact with the Ethereum network. Metamask allows you to send and receive Ether, as well as manage your accounts and transactions.
9 reasons to use Metamask and Uniswap
1. Metamask and Uniswap are two of the most popular decentralized exchanges on the market today. They offer a user-friendly interface and provide secure trading functionality.
2. Metamask and Uniswap allow you to keep your cryptocurrency holdings anonymous. This is great for those who are concerned about their privacy.
3. Metamask and Uniswap provide a wide range of trading options, including fiat currency and cryptocurrency pairs. This makes them ideal for traders of all skill levels.
4. Metamask and Uniswap are both supported by a wide range of wallets, including Bitcoin, Ethereum, and Dash. This means that you can easily store your cryptocurrency holdings in a secure wallet.
5. Metamask and Uniswap offer a wide range of security features, including two-factor authentication and a host of other security measures. This makes them the perfect choice for those who are concerned about their security.
6. Metamask and Uniswap offer a user-friendly platform for trading cryptocurrencies. This makes them a great choice for newcomers to the cryptocurrency market.
7. Metamask and Uniswap offer a wide range of analytical tools, including real-time market data and price alerts. This makes it easy for traders to stay up to date on the latest market movements.
8. Metamask and Uniswap offer a user-friendly platform for buying and selling cryptocurrencies. This makes it easy for newcomers to get started in the cryptocurrency market.
9. Metamask and Uniswap are two of the most popular decentralized exchanges on the market today. They offer a user-friendly interface and provide secure trading functionality.
Metamask and Uniswap: Everything you need to know
If you’re looking to trade tokens on the Ethereum blockchain, you’ll need to use a pair of tools: Metamask and Uniswap. Here’s everything you need to know about each.
Metamask
Metamask is an Ethereum wallet that allows you to interact with the blockchain without having to install any additional software. It uses a Chrome browser extension and supports both Ethereum and ERC20 tokens.
To use Metamask, first make sure you have a Ethereum wallet address. You can find this info in your account settings on Metamask or on Etherscan. Once you have an address, open Metamask and click the “Add Account” button. From here, input your Ethereum wallet address and click “Create Account.”
Once you’ve created an account, open Metamask and navigate to the “My Tokens” section. Here, you’ll see all of the tokens you own or have owned in the past. To add a new token, click the “Add Token” button and input the details of the token: its name, symbol, and Total Supply.
To trade tokens on the Ethereum blockchain, you’ll need to first add a token to your Metamask wallet. Next, open the Metamask app and click the “Contracts” button. Here, you’ll find all of the active contracts on the Ethereum network. To add a new contract, click the “Add Contract” button and input the details of the contract: its address, symbol, and start date.
Uniswap
Uniswap is a cross-platform trading platform that allows you to trade ERC20 tokens with other users. It uses a web browser extension and supports both Ethereum and ERC20 tokens.
To use Uniswap, first make sure you have an Uniswap account. You can create an account by clicking the “Sign Up” button on the Uniswap website or by using the Uniswap browser extension. Once you have an account, open the Uniswap website and click the “Exchanges” button. Here, you’ll find a list of all of the active exchanges on the Uniswap platform. To add an exchange, click the “Add Exchange” button and input the details of the exchange: its name, symbol, and list of tokens.
Next, open the Uniswap browser extension and click the “TRADING” button. Here, you’ll find a list of all of the active trades on the Uniswap platform. To place a trade, click the “Trade” button and input the details of the trade: its destination address (a unique address that you own), amount of tokens to trade, and expiration time.
A beginner's guide to using Metamask and Uniswap
Metamask is a browser extension that allows you to interact with decentralized applications (dapps) and smart contracts. Uniswap is a decentralized exchange that allows you to trade Ethereum and ERC20 tokens.
To get started, launch Metamask and click on the "Add New Wallet" button.
Next, enter the following details into the "Metamask Wallet Address" field:
1. The Metamask wallet address for your Uniswap account
2. The Metamask wallet address for your Ethereum account
3. The Metamask wallet address for your Binance account
4. The Metamask wallet address for your Geth account
5. The Metamask wallet address for your Mist account
6. The Metamask wallet address for your Exodus account
7. The Metamask wallet address for your Trust Wallet account
8. The Metamask wallet address for your MyEtherWallet account
9. The Metamask wallet address for your Poloniex account
10. The Metamask wallet address for your Bitfinex account
11. The Metamask wallet address for your Bittrex account
12. The Metamask wallet address for your Kraken account
13. The Metamask wallet address for your Bitstamp account
14. The Metamask wallet address for your Gemini account
15. The Metamask wallet address for your Huobi account
16. The Metamask wallet address for your HitBTC account
17. The Metamask wallet address for your BitBay account
18. The Metamask wallet address for your YoBit account
19. The Metamask wallet address for your Cryptopia account
20. The Metamask wallet address for your LiveCoin account
21. The Metamask wallet address for your Mercatox account
22. The Metamask wallet address for your Coinomi account
23. The Metamask wallet address for your CoinBase account
24. The Metamask wallet address for your Bancor account
25. The Metamask wallet address for your Korbit account
26. Your Uniswap username (required)
27. Your Uniswap password (required)
28. Your Ethereum address (required)
29. Your Binance API ID (required)
30. Your Geth account address (required)
31. Your Mist account address (required)
32. Your Exodus account address (required)
33. Your Trust Wallet account address (required)
34. Your MyEtherWallet account address (required)
35. Your Poloniex account address (required)
36. Your Bitfinex account address (required)
37. Your Bittrex account address (required)
38. Your Kraken account address (required)
39. Your Bitstamp account address (required)
40. Your Gemini account address (required)
41. Your Huobi account address (required)
42. Your HitBTC account address (required)
43. Your BitBay account address (required)
44. Your YoBit account address (required)
45. Your Cryptopia account address (required)
The ultimate guide to using Metamask and Uniswap
Metamask is a cutting-edge Ethereum browser extension that allows users to interact with decentralized applications (DApps) and contracts. Uniswap is an online marketplace that allows you to buy and sell ERC20 tokens. Here’s everything you need to know to get started:
1. Install Metamask
To use Metamask, you first need to install the extension on your browser. You can find the latest version of Metamask here.
2. Create an account
Once you have installed Metamask, you will need to create an account. To do this, click on the “Metamask” button in the top right corner of the main screen and then enter your email address and password. You will then be asked to approve two third-party cookies. After you have created your account, you will be able to access all of the features of the extension.
3. Connect to your Ethereum wallet
Before you can start using Metamask, you first need to connect your Ethereum wallet to the extension. To do this, click on the “My Wallet” button in the top right corner of the main screen and then enter your wallet address. You will then be asked to approve two third-party cookies. After you have connected your wallet, you will be able to see all of the tokens that are stored in it and manage your transactions.
4. Start trading ERC20 tokens
Now that you have connected your Ethereum wallet and created an account, you can start trading ERC20 tokens. To do this, click on the “Trade” button in the top right corner of the main screen and select the tokens that you want to trade. You will then be able to enter the details of your trade, including the price and the amount of tokens that you are selling or buying. After you have completed your trade, you will be able to see the results in the “Trade History” tab.
Metamask and Uniswap: The perfect partnership for your crypto needs!
If you’re looking for a secure way to store your cryptocurrency and trade it quickly and easily, then you need to add Metamask and Uniswap to your list of options.
Metamask is a plugin that allows you to securely and easily access your cryptocurrency holdings through your browser. You can also use Metamask to make quick and easy trades on the Ethereum network.
Uniswap is a platform that allows you to trade cryptocurrencies with other users directly from your wallet. You can also use Uniswap to convert between different cryptocurrencies.
Together, Metamask and Uniswap make the perfect platform for your crypto needs. They are both secure and easy to use, making them the perfect choice for anyone looking to get into the world of cryptocurrency trading.