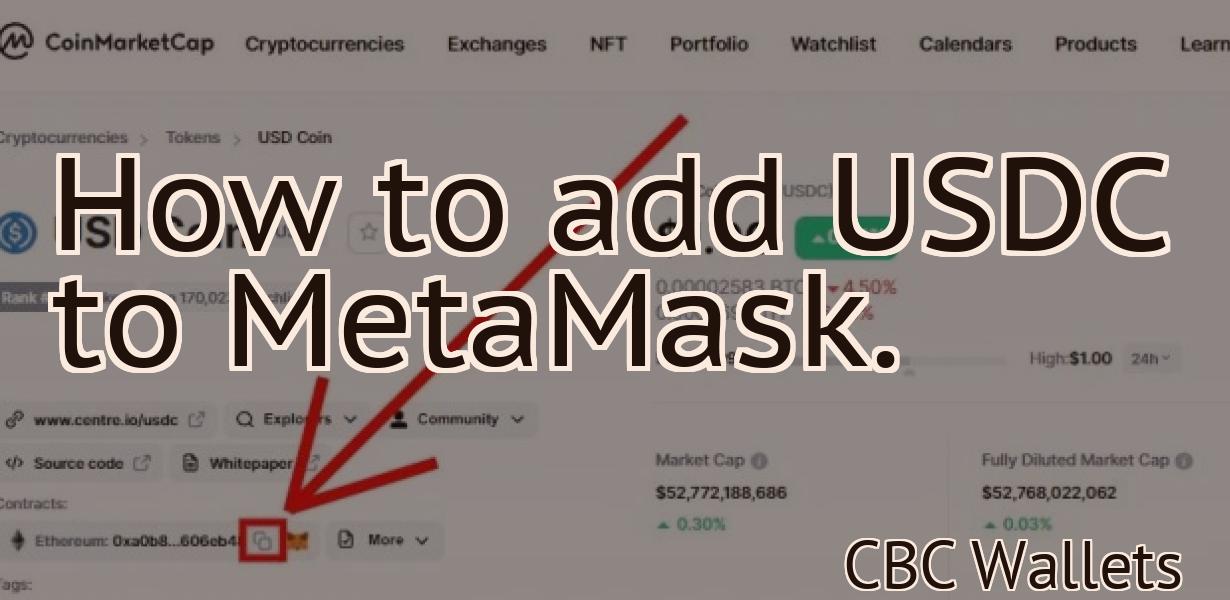
Metamask Help
Metamask is a browser extension that allows you to interact with Ethereum dapps and smart contracts. It also allows you to manage your ETH and ERC20 tokens. In this article, we will show you how to use Metamask and provide some troubleshooting tips.
Metamask: The Complete Guide
to Building a Secure and Trusted MetaMask Account
MetaMask is a Chrome extension that enables users to access their Ethereum and ERC20 tokens without leaving the browser. MetaMask is also one of the most popular and well-known blockchain wallets on the market.
In this guide, we will walk you through the basics of setting up a MetaMask account, as well as introduce some of the more advanced features of the platform. We will also provide tips and recommendations on how to maximize the security and privacy of your MetaMask account.
If you have not already done so, be sure to read our comprehensive guide on how to install and use MetaMask.
1. What is MetaMask?
MetaMask is a Chrome extension that enables users to access their Ethereum and ERC20 tokens without leaving the browser. MetaMask is also one of the most popular and well-known blockchain wallets on the market.
2. How does MetaMask work?
When you install the MetaMask extension, it creates a private key and a public key. The private key is used to generate a unique authentication code that is used to authorize transactions on the Ethereum blockchain. The public key is used to identify you on the Ethereum blockchain.
3. Can I use MetaMask with any ERC20 token?
Yes, you can use MetaMask with any ERC20 token. MetaMask supports a variety of tokens, including Bitcoin, Bitcoin Cash, Ethereum, Litecoin, and EOS.
4. How do I create a new MetaMask account?
To create a new MetaMask account, first install the extension on your browser. After installing the extension, click on the MetaMask logo in the top left corner of the Chrome browser window. This will open the MetaMask main screen.
5. On the main screen, click on the “Create New Account” button. This will open the “Create New Account” form. In the “Account Name” field, you can enter a name for your new account. In the “Email Address” field, you can enter a valid email address for your account. In the “Password” field, you can enter a password for your account. After filling out the “Create New Account” form, click on the “Create Account” button. This will create your new MetaMask account.
6. How do I access my newly created MetaMask account?
To access your newly created MetaMask account, first open the browser window that contains the MetaMask extension. After opening the browser window, click on the MetaMask logo in the top left corner of the window. This will open the main screen of the MetaMask extension. On the main screen, click on the “My Accounts” tab. This will open the “My Accounts” form. In the “Account Name” field, you can enter the name that you entered in the “Account Name” field when you created your account. In the “Email Address” field, you can enter the email address that you entered in the “Email Address” field when you created your account. In the “Password” field, you can enter the password that you entered in the “Password” field when you created your account. After filling out the “My Accounts” form, click on the “Login” button. This will open the “Login” form. In the “Username” field, you can enter your username. In the “Password” field, you can enter your password. After entering your username and password, click on the “Login” button. This will open the “Login Page” form. On the “Login Page” form, you can enter your authentication code (from step 2). After entering your authentication code, click on the “Log In” button. This will open the “MetaMask Main Page” form. On the “MetaMask Main Page” form, you can see all of your active Ethereum and ERC20 tokens. To see your tokens’ balances, click on the “Token Balances” tab. To see your transaction history, click on the “Transaction History” tab. To view information about a specific token, click on the token name in the “Token List” tab. After viewing all of the available features of your newly created MetaMask account, click on the “Close” button. This will close the “MetaMask Main Page” form and return you to the main screen of the MetaMask extension.
7. How do I manage my MetaMask account?
To manage your MetaMask account, first open the browser window that contains the MetaMask extension. After opening the browser window, click on the MetaMask logo in the top left corner of the window. This will open the main screen of the MetaMask extension. On the main screen, click on the “My Accounts” tab. This will open the “My Accounts” form. In the “Account Name” field, you can enter the name that you entered in the “Account Name” field when you created your account. In the “Email Address” field, you can enter the email address that you entered in the “Email Address” field when you created your account. In the “Password” field, you can enter the password that you entered in the “Password” field when you created your account. After filling out the “My Accounts” form, click on the “Manage My Accounts” button. This will open the “Manage My Accounts” form. On the “Manage My Accounts” form, you can: (1) change your password; (2) delete your account; (3) change your email address; (4) block third-party cookies from being sent to your account; and (5) view your account history. After managing your accounts, click on the “Close” button. This will close the “Manage My Accounts” form and return
Metamask: A Beginner's Guide
Metamask is a decentralized application that enables users to manage their privacy and security while using the Ethereum network. Metamask is an open-source project and can be downloaded from the Ethereum website.
To start using Metamask, you will need to create an account and download the Metamask wallet. After you have created an account, you will need to install the Metamask extension for your browser. When you have installed the Metamask extension, you will need to open it and click on the "Add Account" button. If you have already added an account with another wallet provider, you can select that account from the list.
Next, you will need to add a personal keystore file. This file contains your private keys and can be generated using the Ethereum wallet software. You can find the personal keystore file on your computer or in the Metamask extension. After you have added your personal keystore file, you will need to click on the "Create New Account" button.
After you have created an account, you will need to verify your identity. To do this, you will need to provide your email address and password. After you have verified your identity, you will be able to start using the Metamask wallet.
Metamask: How to Use
Metamask
To start using Metamask, first download and install the Metamask extension for your browser.
Once you have installed Metamask, open it and click on the Metamask button in the top left corner.
On the next screen, you will need to provide your personal identification number (PIN) and password.
After you have entered these details, Metamask will start verifying your identity.
Once Metamask has verified your identity, you will be able to start trading Ethereum and other cryptocurrencies.
To trade Ethereum, you will first need to find a cryptocurrency exchange that supports Ethereum trading.
After you have found an Ethereum exchange, you will need to sign up for an account with that exchange.
After you have registered for an account, you will need to provide your personal identification number (PIN) and password.
Next, you will need to deposit money into your account with the Ethereum exchange.
After you have deposited money into your account, you will be able to start trading Ethereum.
Metamask: How to Get Started
with Metamask
To get started with Metamask, you will first need to install the Metamask Chrome extension. You can find the extension on the Chrome Web Store. After installing the extension, you will need to create a Metamask account. To do this, you will need to input your email address and password into the Metamask account registration form. After registering for an account, you will be able to access your Metamask account settings. Within your Metamask account settings, you will find a section called “Add-ons.” Within this section, you will find the “Metamask Extension” tab. Within this tab, you will find the “Install” button. After clicking on the “Install” button, the Metamask extension will be installed on your browser. After the Metamask extension is installed, you will need to open it. To do this, you will need to click on the “Open” button located in the top right corner of the Metamask extension window. After opening the Metamask extension, you will be presented with a new window. Within this window, you will find the “Metamask” tab. Within this tab, you will find the “Manage Accounts” button. After clicking on the “Manage Accounts” button, you will be presented with a new window. Within this window, you will find the “Add Account” button. After clicking on the “Add Account” button, you will be presented with a new window. Within this window, you will need to input your email address and password into the form. After inputting your email address and password, you will be prompted to confirm your account. After confirming your account, you will be able to access your Metamask account. Within your Metamask account, you will find a section called “Wallet.” Within this section, you will find the “Add Item” button. Within this button, you will find the “Metamask Wallet” icon. After clicking on the “Metamask Wallet” icon, you will be presented with a new window. Within this window, you will be able to input the address of the Ethereum wallet that you would like to use with Metamask. After inputting the address of the Ethereum wallet, you will be prompted to confirm your choice. After confirming your choice, you will be able to access your Metamask wallet. Within your Metamask wallet, you will find a section called “Ethereum Contracts.” Within this section, you will find the “Add Contract” button. Within this button, you will find the “Metamask Contract” icon. After clicking on the “Metamask Contract” icon, you will be presented with a new window. Within this window, you will be able to input the address of the Ethereum contract that you would like to use with Metamask. After inputting the address of the Ethereum contract, you will be prompted to confirm your choice. After confirming your choice, you will be able to access your Metamask contract.

Metamask: Tips and Tricks
Metamask is a great tool for managing and interacting with your Ethereum and ERC20 tokens. Here are some tips and tricks to get the most out of Metamask.
1. Add a New Token
To add a new token, first open Metamask and click on the three lines in the top right corner. You will see a list of all the tokens available on the Ethereum network.
Next, click on Add New and enter the details for your new token. You will need to provide a name for your token, a symbol, and an address where your tokens will be stored.
2. Access Your Tokens
Once you have added your new token, you can use it to access your tokens by clicking on the token icon in the top left corner of Metamask. This will open the token info page, which contains information about your token, such as the total supply and the price at which it is currently trading on the Ethereum network.
3. Exchange Tokens
You can also use Metamask to exchange your tokens with other users. To do this, first open Metamask and click on the three lines in the top right corner. You will see a list of all the tokens available on the Ethereum network.
Next, click on Exchange and enter the details of the exchange you want to make. You will need to provide the address of the person you want to exchange tokens with, as well as the amount of tokens you want to exchange.
4. View Your Transaction History
You can also view your transaction history in Metamask. To do this, first open Metamask and click on the three lines in the top right corner. You will see a list of all the tokens available on the Ethereum network.
Next, click on Transactions and select the token you want to view the details of your transactions for. This page will show you all the transactions that have been made with your token, as well as the amount of money involved in each transaction.
Metamask: FAQ
What is Metamask?
Metamask is a web browser extension that allows users to conduct transactions with Ethereum-based tokens and smart contracts. It provides a secure and user-friendly interface for managing your Ethereum holdings. Metamask also provides a built-in exchange for trading Ethereum-based tokens and smart contracts.
How does Metamask work?
Metamask first scans the web for Ethereum-based token or smart contract pages. If a page contains a transaction button, Metamask will display a dialog box that allows you to complete the transaction. If the page does not contain a transaction button, Metamask will display the address of the page's underlying smart contract.
How do I set up Metamask?
To set up Metamask, first download the extension from the Chrome Web Store. After installing the extension, open Chrome and click the three lines in the upper right corner of the browser window. From there, select "Settings" and click on "Add new site." In the "Site title" field, type "Metamask" and click "Add." In the "Description" field, type a short description of Metamask and click "Add." In the "Author" field, type "Your name" and click "Add." In the "Keywords" field, type "Ethereum" and click "Add." In the "Privacy" field, type "Public" and click "Add." In the "Security" field, type "Medium" and click "Add." In the "Access" field, select "Allow all users" and click "Save." Metamask should now be accessible from your browser's extensions menu.
How do I use Metamask?
To use Metamask, first open the extension menu and select "Metamask." From there, select the page or smart contract you wish to transact with. After selecting the page or smart contract, click on the "Transact" button. Metamask will display a dialog box that will allow you to input the details of your transaction. After completing the transaction, Metamask will redirect you to the page or smart contract's original location.
Metamask: Troubleshooting
If you're having trouble using Metamask, we recommend checking the following:
Make sure your computer is up to date. Metamask needs the latest version of Chrome or Firefox to work correctly.
Make sure your computer has a stable internet connection.
Make sure your computer has the latest version of Metamask installed.
Make sure you're using the correct Metamask account. If you're not sure which Metamask account you're using, click on the three lines in the top right corner of the Metamask homepage and click on "Account Settings."
Make sure you're signed in to the Metamask account you're using. If you're not signed in, click on the three lines in the top right corner of the Metamask homepage and click on "Sign In."
Metamask: Features
The Metamask team is constantly working on adding new features to the product. Below are all of the latest Metamask features, as of September 2018.
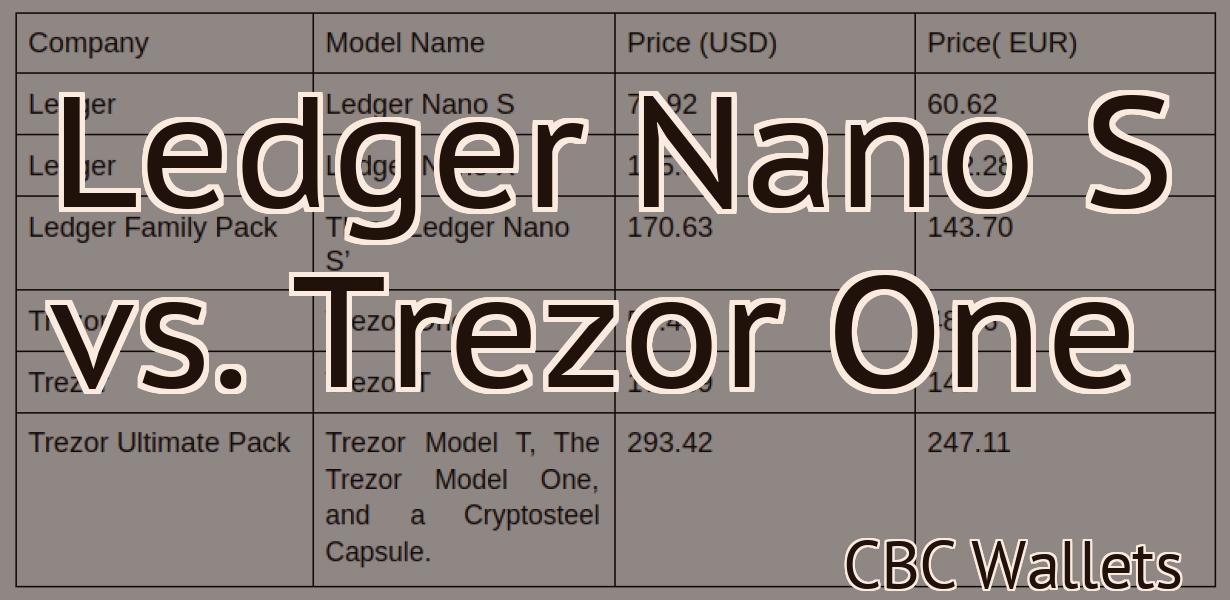
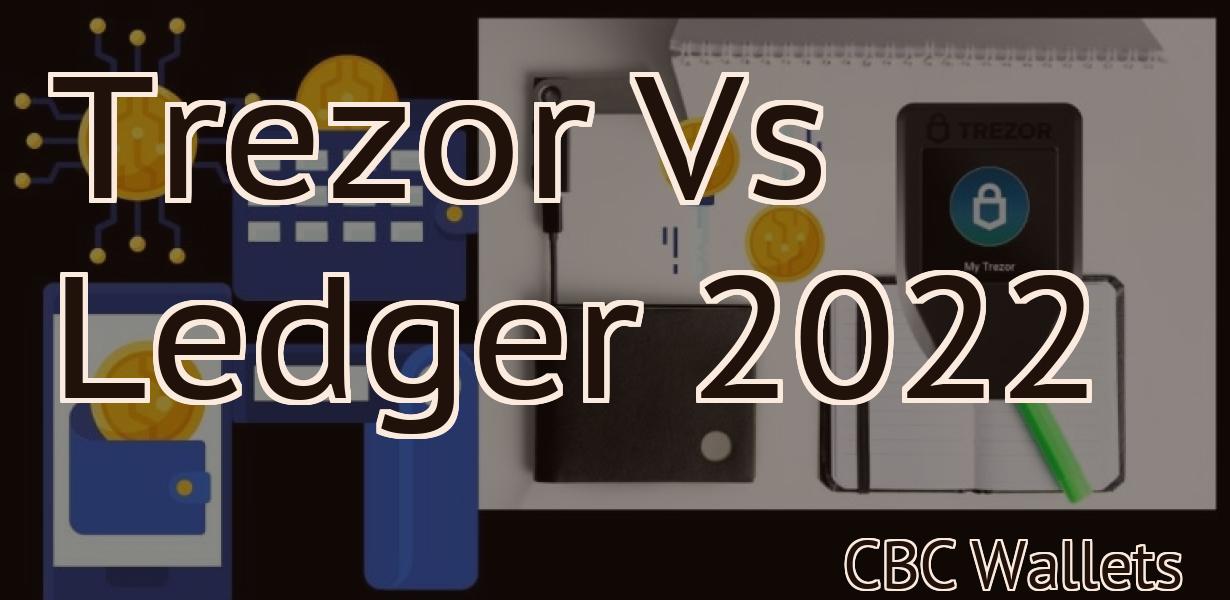
1. Integration with Ledger Nano S and Trezor devices
Metamask now supports integration with the Ledger Nano S and Trezor devices. This means that users can manage their cryptocurrencies and tokens securely and easily using Metamask.
2. New security features
Metamask is now featuring new security features such as two-factor authentication and a password reset feature. This will help to protect users’ cryptocurrencies and tokens from being stolen.
3. New trading features
Metamask is also introducing new trading features such as margin trading and peer-to-peer trading. This will make it easier for users to trade cryptocurrencies and tokens.
4. New wallet features
Metamask is also introducing new features for the wallets section of the product. These features include the ability to add new addresses and send and receive payments.
Metamask: Integrations
with Metamask
There are a few integrations with Metamask that you can take advantage of.
First, Metamask offers an easy way to store your ERC20 tokens in Metamask. You can easily add any ERC20 token to your Metamask account and store it securely.
Second, Metamask offers an easy way to access your ERC20 tokens from any device. You can easily access your ERC20 tokens from your Metamask account on any device.
Third, Metamask offers an easy way to buy and sell ERC20 tokens. You can easily buy and sell ERC20 tokens from your Metamask account.
Metamask: Security
Token Service
What is it?
Metamask is a security token service that allows users to securely store and manage their digital assets, such as cryptocurrencies and tokens. It provides a user-friendly interface that allows users to manage their assets, trade them, and access their data. Metamask also allows users to access numerous Ethereum-based applications and dapps.
Why is it important?
Metamask is important because it allows users to securely store and manage their digital assets, such as cryptocurrencies and tokens. Moreover, Metamask allows users to access numerous Ethereum-based applications and dapps.