Bsc Metamask Setup
This article provides a step-by-step guide on how to set up Metamask for use with the Binance Smart Chain.
Bsc metamask setup: the easy way
1. Install Metamask
Metamask is a browser extension that allows you to run ERC-20 and ERC-721 tokens. It’s available for Chrome, Firefox, and Opera. You can also use Metamask to access decentralized exchanges and other decentralized applications.
2. Add a token
To add a new token, go to the Metamask home page and click on the “Add token” button. This will open the Add Token page.
3. Enter the details about the token
You will need to enter the following information:
Name: The name of the token
Symbol: The symbol of the token
Decimals: The number of decimal places used for the token’s price
Token type: ERC-20 or ERC-721
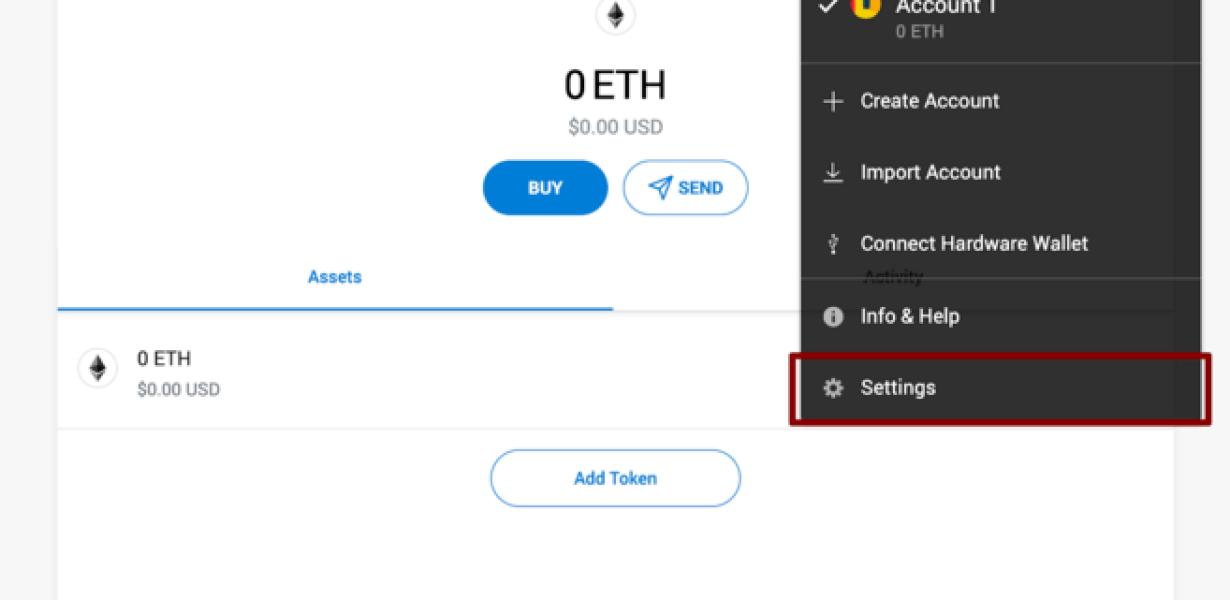
4. Add a wallet
To add a wallet, click on the “Add wallet” button. This will open the Add Wallet page.
5. Select a wallet
You will need to select a wallet from the list. Metamask will then ask you to confirm your selection.
6. Click on “Add token”
After you have added the token, you will need to click on the “Add token” button to finish the process.
setting up your Bsc metamask account
To set up your Bsc metamask account, follow these steps:
Go to metamask.com and click on the "Create a New Account" button. Enter your email address and password. Click on the "Create Account" button. On the "My Account" page, click on the "Settings" button. On the "Settings" page, click on the "Add Token" button. On the "Add Token" page, enter the following information: Name : Bsc
: Bsc Description : Bsc Metamask Token
: Bsc Metamask Token Symbol : BSCT
: BSCT Decimals: 18 Click on the "Create Token" button. On the "Summary" page, you will see the following information: Your Bsc metamask token has been created!
To use your Bsc metamask token, go to metamask.com and click on the "Create a New Account" button. Enter your email address and password. Click on the "Create Account" button. On the "My Account" page, click on the "Send Tokens" button. On the "Send Tokens" page, enter your Bsc metamask token and click on the "Send" button.
How to set up Bsc metamask
1. Go to https://metamask.io/ and click on the “Create a New Account” button.
2. On the next page, enter your desired username and password.
3. Click on the “Finish” button to create your Bsc metamask account.
4. On the main Bsc metamask page, click on the “Add Custom Token” button.
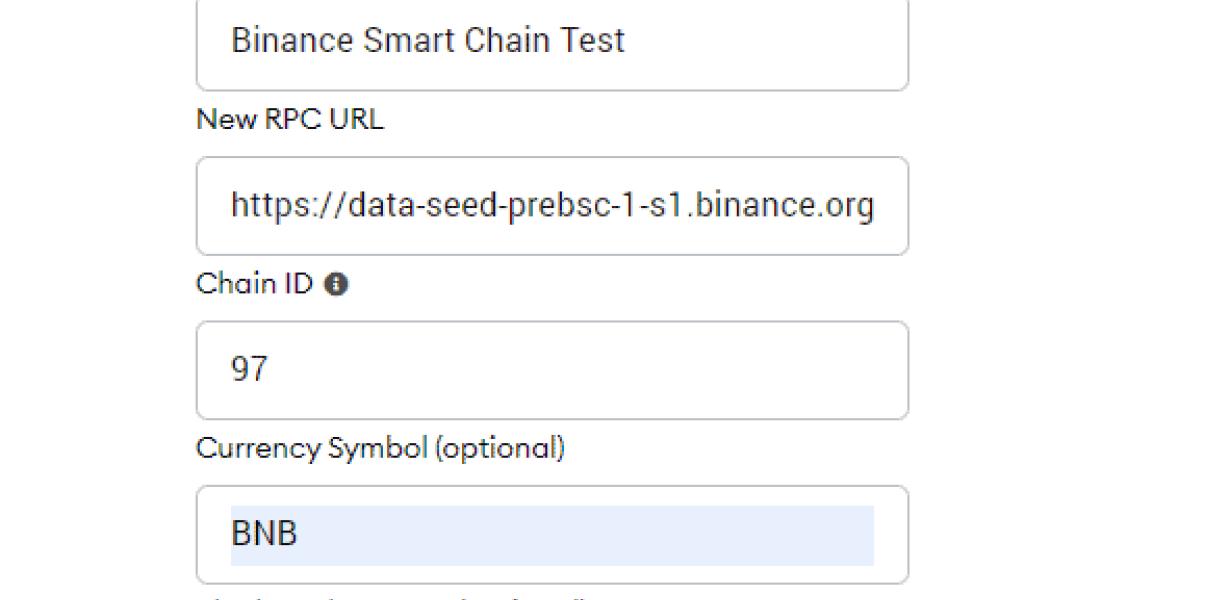
5. On the next page, enter the following information:
• Name: Bsc
• Symbol: BSCT
• Decimals: 18
6. Click on the “Create Custom Token” button.
7. On the next page, you will be asked to confirm the creation of your Bsc metamask token. Click on the “Confirm” button to finish the setup process.
A step by step guide to setting up Bsc metamask
To set up Bsc metamask, follow these steps:
1. Launch Bsc metamask.
2. Click on the “Settings” button in the upper right corner of the Bsc metamask window.
3. Under the “Settings” tab, you will find the “Addresses” section. In this section, you will need to add an address to use with Bsc metamask. To do this, click on the “+” icon next to the “Address” field and enter the address of your Bsc metamask wallet.
4. Next, you will need to enable the “Bsc” token. To do this, click on the “+” icon next to the “Token” field and input the symbol for the Bsc token.
5. Finally, you will need to specify your personal information. To do this, click on the “+” icon next to the “Name” field and enter your name. You can also enter a profile picture if you want.
Once you have completed these steps, you will be able to use Bsc metamask to make transactions and access your Bsc tokens.
The ultimate guide to setting up Bsc metamask
This guide will show you how to set up Bsc metamask in order to start trading cryptocurrencies.
1. Download and install Bsc metamask
Bsc metamask is a desktop application that you can download and install on your computer.
2. Create an account with Bsc metamask
To create an account with Bsc metamask, you first need to login. Once you have logged in, you will be able to create a new account or login to an existing account.
3. Add funds to your account
Before you can start trading cryptocurrencies, you will need to add funds to your account. You can do this by clicking the “Add Funds” button on the main screen of Bsc metamask.
4. Start trading cryptocurrencies
Now that you have added funds to your account and logged in, you can start trading cryptocurrencies. To do this, click the “Start Trading” button on the main screen of Bsc metamask.
How to get started with Bsc metamask
To get started with Bsc metamask, you will first need to install the Bsc metamask extension.
To install the Bsc metamask extension:
1. Open the Google Chrome browser and click on the three lines in the top right corner of the screen.
2. Click on "Extensions".
3. Search for "Bsc metamask" and click on the "Install" button.
4. When the installation is complete, click on the "Open" button.
5. In the "Bsc metamask" extension window, click on the "Configure" button.
6. In the "Configure Bsc metamask" window, click on the "Add Custom Token" button.
7. In the "Add Custom Token" window, enter the following information:
• Token name: Bsc_metamask
• Token value: Bearer token
• Click on the "Create" button.
8. When the "Configure Bsc metamask" window is closed, click on the "OK" button.
9. In the "Bsc metamask" extension window, click on the "Active" button.
10. In the "Active Bsc metamask" window, you will now be able to access your Bsc metamask account.
Setting up Bsc metamask for beginners
1. Open your Bsc metamask account.
2. Click on the "Add Custom Token" button on the top left corner of the Bsc metamask interface.
3. Enter the following information into the "Custom Token" field and click on the "Create" button:
name: My Custom Token
symbol: MCO
4. Click on the "My Custom Token" icon in the top right corner of the Bsc metamask interface to view your token's details.
5. To use your My Custom Token, open the Bsc metamask app and click on the "Token" button in the top left corner of the main screen. On the "Token Details" screen, enter your My Custom Token into the "Token Address" field and click on the "Activate" button.
How to set up your Bsc metamask account
To set up your Bsc metamask account, follow these steps:
First, create a new metamask account by clicking on the “Create a New Metamask Account” button on the metamask website.
Once you have created your new metamask account, open it and click on the “Settings” button.
In the “Settings” page, click on the “Crypto” tab.
On the “Crypto” tab, click on the “Add Custom Token” button.
Enter the following information into the “Name” field:
BSC
In the “Description” field, you can write a short description of what this token represents.
Click on the “Add Custom Token” button.
After you have added your Bsc metamask token, click on the “Save” button.
Now, you need to add your Bsc metamask account to your Bsc metamask account. To do this, follow these steps:
Open the Bsc metamask account that you want to add your Bsc metamask account to.
Click on the “Accounts” button.
Click on the “Add Account” button.
In the “Accounts” page, enter the following information into the “Username” field:
Your Bsc metamask username
In the “Password” field, enter the password that you used to create your Bsc metamask account.
Click on the “Add Account” button.
After you have added your Bsc metamask account to your Bsc metamask account, you will now be able to access it from the “Accounts” page.
Setting up Bsc metamask: a step-by-step guide
1. In Bsc metamask, go to “Settings” and select “Add account”.
2. In the “Add account” window, enter the following information:
a. Email address: your Bsc metamask email address
b. Password: your Bsc metamask password
3. Click on the “Next” button.
4. In the “Account details” window, click on the “Metamask” button.
5. Under the “Metamask settings” section, click on the “Generate new key” button.
6. In the “Generate new key” window, enter the following information:
a. Email address: your Bsc metamask email address
b. Password: your Bsc metamask password
7. Click on the “Next” button.
8. In the “Key details” window, click on the “Upload file” button.
9. In the “Upload file” window, drag and drop the Metamask key you just generated onto the window.
10. Click on the “Next” button.
11. In the “Confirm account” window, click on the “Create account” button.
12. You will now be redirected to your Bsc metamask account page.