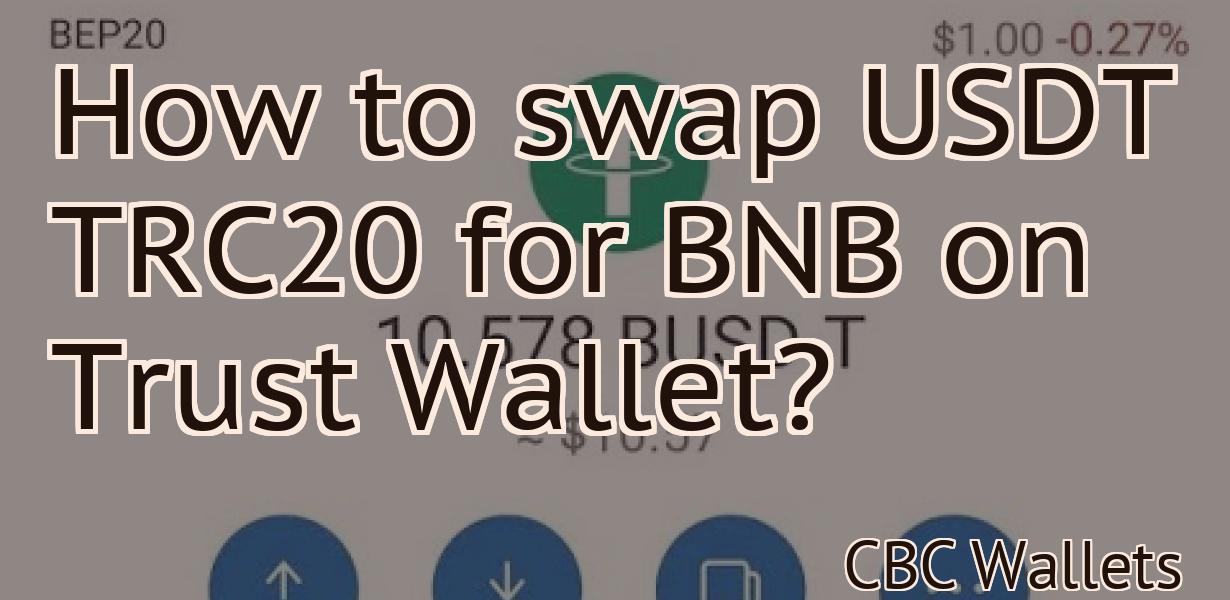
Binance Testnet Metamask
Binance Testnet Metamask is a browser extension that allows you to easily interact with the Binance testnet. It lets you manage your accounts, send and receive transactions, and even sign smart contracts.
Binance Testnet: How to Use Metamask
To use Metamask on Binance Testnet, first open the Metamask app and click on the “Create a new account” button. Enter the required information and click on the “Create Account” button.
Next, open the Binance Testnet account and click on the “Metamask” button on the top right corner. Metamask will open and ask you to install the Ethereum Mist browser extension. Click on the “Install” button and Metamask will start to install the extension. Once the installation is complete, click on the “Launch” button.
Now, open the Ethereum Mist browser extension and click on the “Metamask” button on the top right corner. Metamask will open and ask you to sign in. Enter your Binance Testnet account name and password and click on the “Sign In” button. Metamask will then show you the list of ERC20 tokens available on the Binance Testnet.
Binance Testnet Now Available on Metamask
The Binance Testnet is now available on Metamask. You can find the link in the Metamask app under the “Features” tab. This is a beta version and you may experience some issues. Please report any issues you encounter to us at [email protected].
Now You Can Use Metamask with Binance Testnet
Metamask is a Chrome extension that allows you to use Binance’s Testnet.
To get started, open Metamask and click on the “Extensions” button in the top right corner.
Select the “Binance Testnet” extension and click on the “Enable” button.
You will now be able to access the Binance Testnet by clicking on the “Testnet” button in the top left corner of the Metamask window.
How to Access Binance Testnet through Metamask
1. Open Metamask and click on the three lines in the top left corner.
2. In the “Token Balances” section, find Binance Testnet and select it.
3. In the “Token Contract Address” section, copy the address shown.
4. Open a new tab and go to https://testnet.binance.com.
5. Click on the “Register” button and paste the address you copied in the “Contract Address” field.
6. Click on the “Register” button and confirm your account.
Using Metamask with Binance Testnet
Metamask is a Chrome extension that allows users to interact with the Ethereum network. Once installed, Metamask will allow you to access the Binance Testnet.
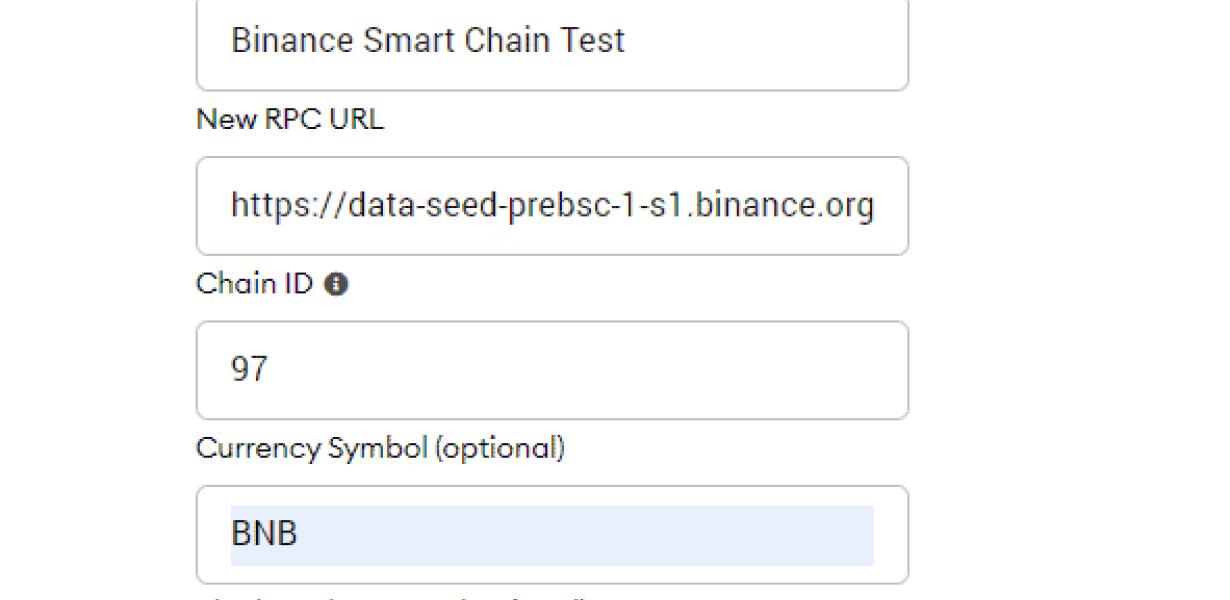
To begin, open Metamask and click on the three lines in the top left corner. Next, click on "Settings" in the top right corner. In the "Settings" window, click on the "Gas" tab. Under "Gas Limit," set the gas limit to 30000. Under "Gas Price," set the gas price to 0.00000001 ETH. Finally, under "Network," set the network to "Binance Testnet."
Now, when you visit any web page that uses JavaScript, you will need to include a script tag that includes Metamask's code. For example, if you were going to visit https://coinmarketcap.com/, you would include the following code in your web page:
Once you have included the Metamask code, you will be able to interact with the Binance Testnet!
Binance Testnet and Metamask: How to Use Them Together
If you want to use Binance Testnet and Metamask together, here’s how:
1. First, open the Metamask app and click on the “Configure” button.
2. In the “Configure Metamask” window, click on the “Settings” tab.
3. Under the “Web3” heading, select the “Binance Testnet” network.
4. Click on the “Save” button.
5. Next, open the Binance Testnet wallet and click on the “Login” button.
6. Type in your Binance credentials and click on the “Login” button.
7. Once you’re logged in, click on the “Funds” tab and select the “Deposit” button.
8. Type in the amount of Binance Testnet coins you want to deposit and click on the “Deposit” button.
9. Finally, click on the “Trade” tab and select the “Binance Testnet” market.
Getting Started with Binance Testnet and Metamask
If you want to start using Binance Testnet, you first need to create a Metamask account. Metamask is a browser extension that allows you to conduct transactions on the Binance blockchain.
To create a Metamask account, open the Metamask website and click on the "Create New Account" button. Enter your desired username and password and click on the "Create Account" button.
Once you have created your Metamask account, you will need to add it to your browser. To do this, open the Chrome browser and click on the "3 horizontal lines" icon in the top right corner of the browser window. This will open the Extensions page. Click on the "Add an Extension" button and select the "Metamask" extension. Click on the "Install" button and follow the instructions that appear on the screen.
Now that you have created a Metamask account and added it to your browser, you are ready to start using Binance Testnet. To do this, click on the "Binance" logo in the top left corner of the browser window and then click on the "Binance Testnet" link. This will take you to the Binance Testnet page.
On the Binance Testnet page, you will need to copy the address of your Binance Testnet account. To do this, click on the "Account" link in the top left corner of the page and then click on the "Copy Address" button. This will open the Copy Address window. Paste the address that you copied into the "Address" field and click on the "Copy" button.
Now that you have copied the address of your Binance Testnet account, you are ready to start using it. To do this, click on the "Trade" link in the top left corner of the Binance Testnet page and then click on the "Binance Testnet Trade" link. This will take you to the Binance Testnet Trade page.
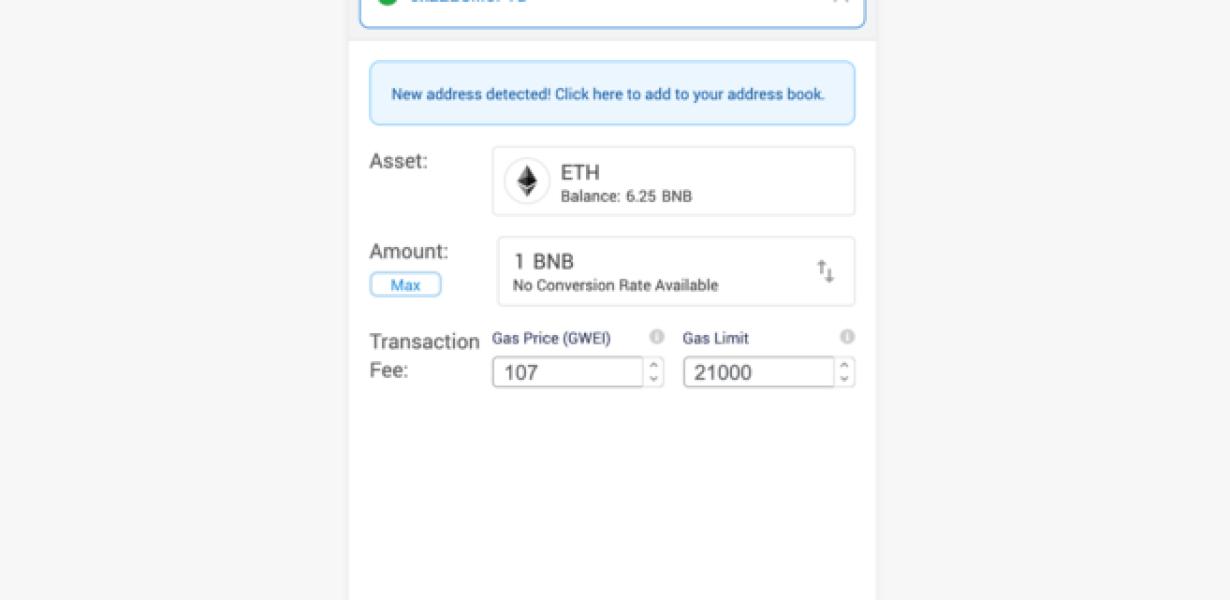
On the Binance Testnet Trade page, you will need to enter the amount of Binance Testnet tokens that you want to trade. To do this, enter the number of Binance Testnet tokens that you want to trade in the "Amount" field and then click on the "Trade" button.
Now that you have traded Binance Testnet tokens, you will need to wait for the transaction to be confirmed. This process can take up to 10 minutes, so be patient. Once the transaction has been confirmed, you will be able to see the results of your trade in the "Results" field.